Saturday 22 February 2014

Static Code Analyzers - Google CodePro AnalytiX - Why is it premium eclipse plugin for java developers?

Important Note: Looks like original Codepro urls are not accessible anymore. It is highly likely that Google has removed it from its dev products list. Still if you want to experiment lastly released Codepro Analytix version for Eclipse 3.7, you can refer Codepro plugin download url from dropbox in my comment of this post.

------

I hope, you have already read "Preface" of my static code analyzers series.

How meticulous are you about the quality of the java code you deliver? Instead of just depending on your own knowledge or manual peer code review, do you perform self code audit using tools?

Do you use or aware about static code analyzers for code review such as Checkstyle, PMD, FindBugs? If not, then read my previous post - Checkstyle, PMD, FindBugs - Are those alternatives or not?.

In this post, I would focus to answer - why CodePro AnalytiX is highly supportive eclipse plug-in for java developers to improve code quality of software effectively?

Straight from the horse's mouth

CodePro AnalytiX is the premier Java software testing tool for Eclipse developers who are concerned about improving software quality and reducing developments costs and schedules. The Java software audit features of the tool make it an indispensable assistant to the developer in reducing errors as the code is being developed and keeping coding practices in line with organizational guidelines. The ability to make corrections to the code immediately can dramatically reduce developments costs and improve the speed of finished product delivery. Join the ranks of top software industry leaders and the Fortune 500 who have standardized around CodePro Analytix as the most cost effective fully featured tool in the industry.

My Personal Feedback
  • When to use and key features?
    • You must consider to adopt it in routine development life, if you (1) are Java/J2EE developer (2) use Eclipse IDE for development (3) have not adopted other  single tool or  multiple tools offering range of features which are similar to features of CodePro AnalytiX tool.
  • Initial learning curve and ease-of-use, Setup requirements?
  • Cost (Free or Commercial)?
    • Free
  • Limitations / Challenges?
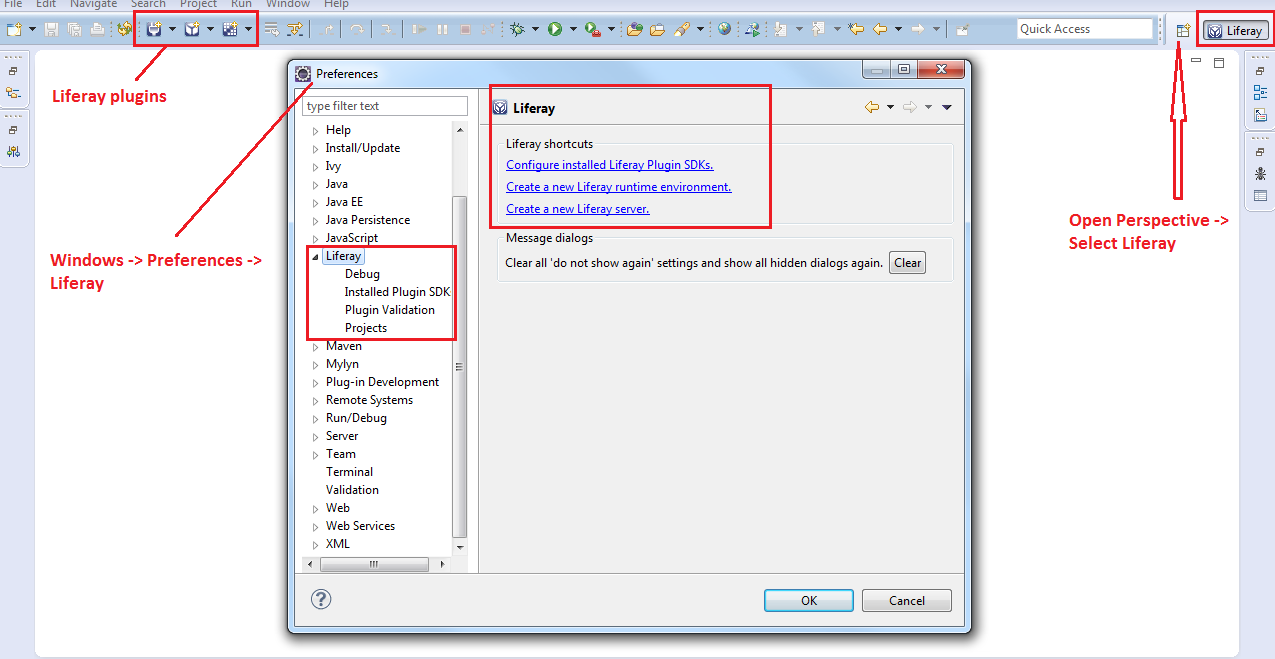
    • Codepro plugin is available to install in Eclipse 3.4 (Ganymede) to Eclipse 3.7 (Indigo) only as on 22-Feb-2014. That means, officially Codepro plugin download is not available for Eclipse Juno or Eclipse Kepler or latest version of Eclipse! When I installed available "Eclipse 3.7 (Indigo) Codepro plugin" in Eclipse Kepler, that works without any noticeable problem (as shown further in practical shot). You would get warning message something like "Codepro product version is incorrect for this version of Eclipse", so just select to suppress this warning message.
    • The biggest downside of CodePro AnalytiX is that, it is not targeted to upgrade for long time to support latest Eclipse IDE and Java programming features. For example, sadly it may not assist developers to code effectively for new functional programming features of Java 8 and so on. At this stage it looks like, the awesome CodePro AnalytiX tool will become obsolete gradually. However exact future directions are always unpredictable!

Practical Shot

For demonstration purpose, I highlighted my favorite top 3 features of CodePro Analytix on the code of one of open source project, which I used in past (MockMock: a cross-platform SMTP server built on Java which allows you to mock email sending functionality and to see how emails look like).

  • Configure custom new rule set (e.g. XYZ project coding rules) and code audit using it. (STEP - 1 to 3)Go to Windows -> Preferences -> CodePro ->  Audit -> Rule Sets -> Add New -> Select applicable General and JEE rules -> Finish. This will add "XYZ project coding rules" rule set. (STEP - 4) Now right click your project and go to CodePro tools -> Audit using -> Select your custom rule set (e.g. "XYZ project coding rules") from the available audit rule sets -> OK. (STEP - 5) Wow, here it gives you the code review results along with axiomatic recommendations in CodePro "Audit" view. You can group by results using options like group by rule sets, severity, resources, authors.

  • Measure and report on key quality indicators in a body of Java source code. Right click your project and go to CodePro tools -> Click Compute Metrics option. It would show "Metrics" view.

  • Perform Dependency Analysis. Right click your project and go to CodePro tools -> Click Analyze Dependencies option. It would show "Dependencies" view. (1) depicts the dependencies between selected "spring-mock-smtp" project and external jar libraries used in the project, for example the "spring-mock-smtp" project has 15 outgoing reference counts to "spring-beans-*.jar" library (2) If you click the project (e.g. spring-mock-smtp), it would show dependencies among packages of the project. The red color depicts the circular dependencies, which is indication of design smell. (3) If you click package (e.g. com.mockmock.htmlbuilder), it would show dependencies among internal entities like classes and interfaces.

  • The remaining features are also amazing and it provides ability to generate HTML reports for offline analysis. Refer CodePro AnalytiX documentation, if you are exited to evaluate and understand CodePro Analytix  in better way!

My Final Thoughts
  • Google's CodePro AnalytiX is unique and awesome FREE offering powered by Eclipse technology, which Java developers must use or at least be aware. It’s pretty simple, because just install its Eclipse plugin and start using it. It's one of the excellent tool to perform self or peer code review effectively at this stage.

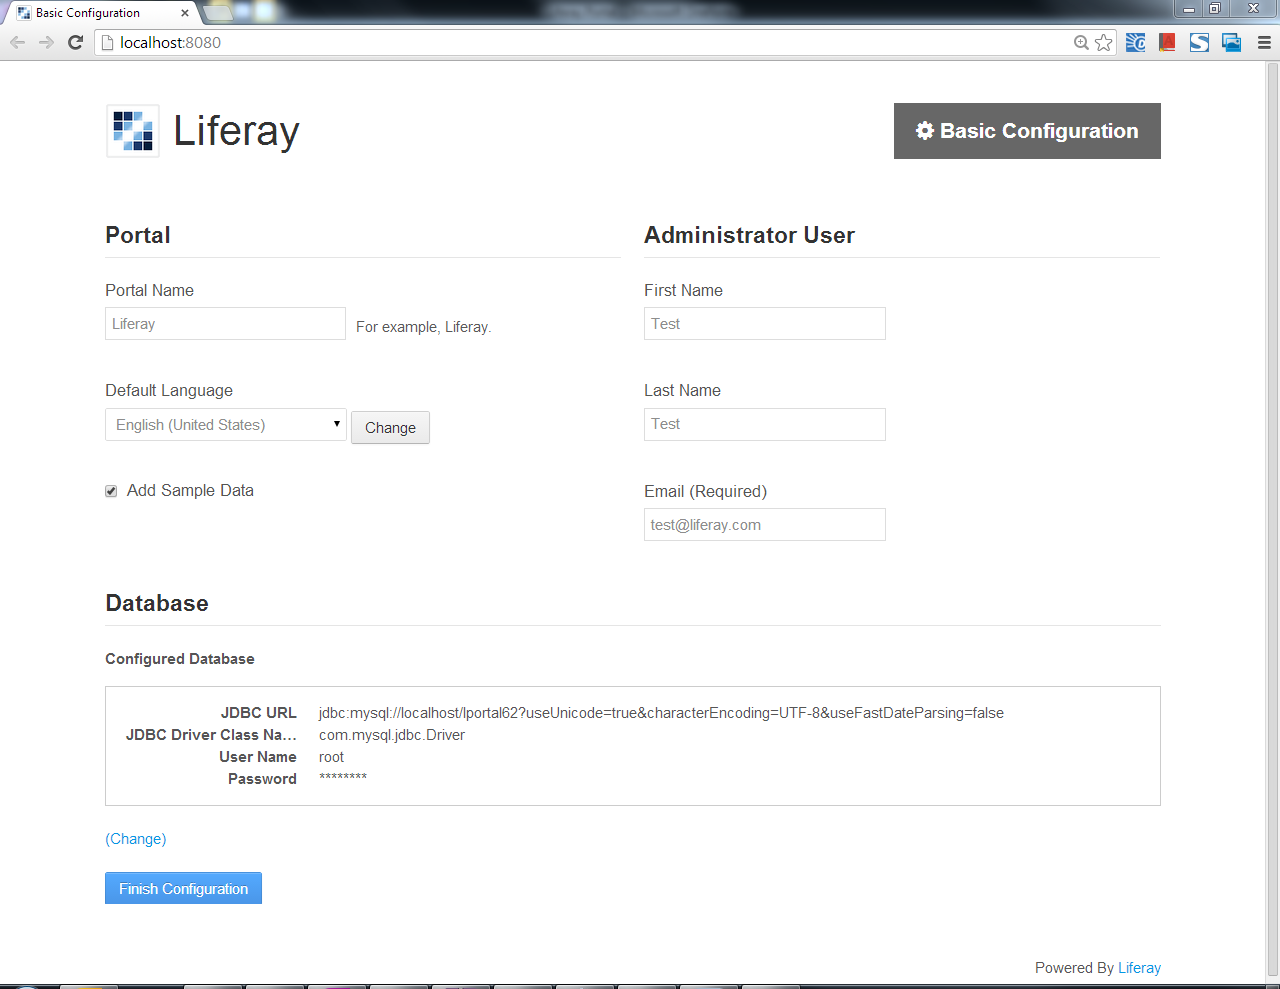
  • You may favor widely known SonarQube (Sonar)  tool instead of CodePro Analytix, which is also powerful like CodePro AnalytiX and having even some more capabilities. But to use Eclipse SonarQube plugin, it demands to setup SonarQube server using supported Database (i.e. MySQL, MSSQL, etc.) to get started. Once SonarQube server is setup, certainly you can easily use SonarQube plugin or may integrate it with other tools like Maven (build), Jenkins (CI), etc… But still if any developer wants to leverage code quality in simplest form, then CodePro AnalytiX is one of the best tool I have experienced.

  • While promoting usage of Codepro AnalytiX in this post - By keeping the cost factor in mind, I have not counted some of excellent commercial expensive architectural and code quality management tools such as jArchitect, Structure101, Lattix for Java and many more.

History


  • 26/Jun/16 - Added important note in the beginning of the post.

Disclaimer
I don't aim to exploit code of any open source project or sample application, while I share my evaluation feedback of given tool on selected publicly available code. Also I am not biased to particular free or commercial tools, rather my objective is about sharing my own experience on set of tools.

Also Refer

Saturday 15 February 2014

Overview of OSGi and How to get started with it?

The OSGi framework is a module system and service platform for the Java programming language that implements a complete and dynamic component model, something that does not exist in standalone Java/VM environments. Applications or components (coming in the form of bundles for deployment) can be remotely installed, started, stopped, updated, and uninstalled without requiring a reboot; management of Java packages/classes is specified in great detail. Application life cycle management (start, stop, install, etc.) is done via APIs that allow for remote downloading of management policies. The service registry allows bundles to detect the addition of new services, or the removal of services, and adapt accordingly. (source: Wikipedia)

In 2012, I worked on OSGi in one of J2EE project to enforce modularity and initially I used to think I can build the similar modular architecture without OSGi too. Also at that time sometimes I found it as an overhead to deliver individual components/modules (jar files called bundles in OSGi terminology) specifically in time crunch situations, until I realized the real power of OSGi when again got chance to experience "OSGi as part of Adobe CQ5" in 2013. Recently as part Liferay Portal 6.2 new features highlights, I found one of feature is "Liferay as an OSGi container" to support deployment and management of OSGi components in Liferay.

Looking to continued adoption of OSGi in Java platform based applications, I thought to publish the summary of my OSGi mind mapping notes and how I learned it.

Straight from the horse's mouth

OSGi Alliance - Why OSGi?
  • OSGi reduces complexity by providing a modular architecture for today's large-scale distributed systems as well as small, embedded applications. Building systems from in-house and off-the-shelf modules significantly reduces complexity and thus development and maintenance expenses. The OSGi programming model realizes the promise of component-based systems.
  • The OSGi modular and dynamic model reduces operational costs and integrates multiple devices in a networked environment, tackling costly application development, maintenance and remote service management.
  • The key reason OSGi technology is so successful is that it provides a very mature component system that actually works in a surprising number of environments. The OSGi component system is actually used to build highly complex applications like IDEs (Eclipse), application servers (GlassFishIBM WebsphereOracle/BEA WeblogicJonasJBoss), application frameworks (SpringGuice), industrial automation, residential gateways, phones, and so much more.

  • OSGi is a fundamental element in the technology stack of Adobe Experience Manager (a complete suite of applications that enable organizations to optimize their online communications). It is used to control the composite bundles of AEM and their configuration.
  • OSGi defines an architecture for developing and deploying modular applications and libraries (it is also known as the Dynamic Module System for Java). OSGi containers allow you to break your application into individual modules (are jar files with additional meta information and called bundles in OSGi terminology) and manage the cross-dependencies between them with: (1) services implemented within the container (2) a contract between the container and your application. These services and contracts provide an architecture which enables individual elements to dynamically discover each other for collaboration.
  • An OSGi framework then offers you dynamic loading/unloading, configuration and control of these bundles - without requiring restarts. This allows easy management of bundles as they can be stopped, installed, started individually. The interdependencies are handled automatically. Each OSGi Component (see the OSGi Specification) is contained in one of the various bundles. 
  • Below screenshot shows the power of OSGi in administration console of Adobe CQ/AEM product.

Overview of OSGi
Below notes depicts that OSGi is the specification (not implementation) to solve some of mentioned challenges in Java. The OSGi container (Eclipse Equinox, Apache Felix and  Knopflerfish are open source, but there are commercial vendors too) provides implementation to deploy bundles (the unit of deployment of an OSGi service platform). From developer's point of view, it requires to understand bundle lifecycle, configuration (MENIFEST.MF) and commands of OSGi. There are also some of OSGi related projects such as SpringDM /Spring-OSGi, which can be explored once get some OSGi experience.


How to get started with OSGi?
If you can manage to read "OSGi in Action" book, then nothing like that. Otherwise you can get started with OSGi as below, which should not take roughly more than 2-3 days depending on your Java experience.

  1. Read theory of the OSGi Framework Architecture and below diagram depicts that key responsibilities of the OSGi container.

  1. Learn to creating, executing, and managing bundles in an OSGi container. As Eclipse IDE is widely used for java development and hence I would strongly recommend to start with Eclipse Equinox tutorial-1 and tutorial-2 (Alternatively you may try tutorial of OSGi for your selected OSGi container type such as Apache Felix or Knopflerfish).

  1. Learn to build a service-oriented application using Spring and OSGi and then explore Spring DM documentation as applicable in your project.

  1. Learn how to use OSGi to build web applications.

Also Refer

Saturday 8 February 2014

Liferay Portal 6.2 - Getting Started Guide - Development Setup using Eclipse Kepler

*** This post is for Liferay Portal 6.2. Do you know, Liferay Portal 7 CE is already released? See Liferay Portal 7 - Getting Started Guide Series. ***

This post is for you - if you are new to Liferay Portal, but you already have enough experience with Java development using Eclipse.

If you are new to portal, then read what is portal? If you are new to Liferay portal, then read what is Liferay Portal? But most of time, we don't understand all theoretical fundamentals until we try something practically. So first attempt should be to setup Liferay environment. There are multiple options available for Liferay Development, which are covered at depth in developer guide (refer those if you are a beginner java developer).

If you already have good experience with Eclipse IDE and Java development, you can start with Liferay portal development using Eclipse just by following below quick steps.

Environment - Windows 7, Liferay 6.2 CE Bundled with Tomcat, Eclipse Kepler [***NOTE - I have used mentioned environment, but similar steps should work even if you use different OS or Eclipse version]

Step 1 - Make sure you have a supported Java JRE and Eclipse release already installed on your machine
  • Java 6.0 JRE or greater.
  • Liferay IDE must be run in one of the following Eclipse releases: Eclipse Kepler Java EE (4.3.x), Eclipse Juno Java EE (4.2.x), Eclipse Indigo Java EE (3.7.x)

Step 2 - DownloadLiferay & unzip those in your choice of folder (e.g. you may create "Liferay_LAB" folder)
  • Portal Bundled with Tomcat (or your choice of server container) as a Liferay runtime environment --- liferay-portal-tomcat-6.2.0-ce-ga1-20131101192857659.zip
  • Plugins SDK (software development kit) to develop custom plugins (e.g. portlets, hooks, ext, themes, layout) and deploy on Liferay server --- liferay-plugins-sdk-6.2.0-ce-ga1-20131101192857659.zip
  • Portal Documentation --- liferay-portal-doc-6.2.0-ce-ga1-20131101192857659.zip
  • Portal Source Code of CE (community edition) --- liferay-portal-src-6.2.0-ce-ga1-20131101192857659.zip


Step 3 - Setup Liferay Portal
  • By default it comes with embedded "HSQL" database. However I recommend to configuration it to use your choice of database such as MySQL or MSSQL (Liferay supports range of databases, but for exact supported version you need to refer "Liferay support matrix").
  • Portal custom configuration and change database from default "HSQL" to other database:
    1. Create new database with name "lportal62" (or any name you can give) in your selected DB.
    2. Create new "portal-ext.properties" file in root folder of your Liferay portal server (in the unzipped folder of "liferay-portal-tomcat-6.2.0-ce-ga1-20131101192857659.zip").
    3. Add below configuration in "portal-ext.properties" file (update it as per your settings). Below configuration is for MySQL, but if you select any other then accordingly mention appropriate values of "jdbc.default.driverClassName" and "jdbc.default.url".

# Liferay portal root folder location
liferay.home=D:/Tirthal-LABs/Liferay/liferay-portal-6.2.0-CE-GA1/

# MySQL database configuration
jdbc.default.driverClassName=com.mysql.jdbc.Driver
jdbc.default.url=jdbc:mysql://localhost/lportal62?useUnicode=true&characterEncoding=UTF-8&useFastDateParsing=false
jdbc.default.username=xxxxx
jdbc.default.password=xxxxx


  • Start Liferay Portal - Go to bin folder in tomcat (e.g. liferay-portal-6.2.0-CE-GA1\tomcat-7.0.42\bin) - Run "startup.bat". Wait… wait… It would take few minutes to create required database tables and start the server. When you start liferay portal for the first time, you would see sequence of events as per below screens.
    • Database tables are created.
    • Some of out-of-box portlet applications are deployed in liferay server and at the end server started successfully.
    • Automatically it would open browser with default Liferay screen (If you close by mistake, you can always open it using http://localhost:8080/ url). Now you just validate click "Finish Configuration", which would again take few minutes.

    • Now you would see "finished adding data" message.
    • Then you would see this page in browser (showing file location where it saved setup wizard settings). Next you just need to click "Go to My Portal".
    • Now click "Agree" button and then in next screen save "Password Reminder" answer.
    • Congratulations… Finally you would get "Welcome" page of Liferay. If you wish to explore out-of-the-box (OOTB) features of Liferay 6.2, then you can refer Liferay 6.2 User Guide.
  • Stop Liferay Portal - Go to bin folder in tomcat (e.g. liferay-portal-6.2.0-CE-GA1\tomcat-7.0.42\bin) - Run "shutdown.bat". In 2-3 minutes, it would stop server and close the command prompt. That's it. [***NOTE - Stop server without fail, as in next step we'll integrate it in Eclipse IDE to start/stop using Eclipse during development.]

Step 4 - Install Liferay Plugins in your Eclipse IDE (3.7 or greater) in same way you install other Eclipse plugins

Step 5 - Setup Eclipse IDE for Liferay Development Environment
  • Configure new Liferay Server = Windows -> Preferences -> Liferay -> Create new Liferay Server -> Select Liferay v6.2 CE Server (Tomcat7) and click Next -> Select Liferay Tomcat directory and click Next -> Select Liferay Javadoc and source code -> click Finish.
  • Configure  new Liferay Plugin SDK  = Windows -> Preferences -> Liferay -> Installed Plugin SDK -> Add (configure unzipped Liferay plugin SDK folder o n your machine as per below screen) -> OK.
Now create a new "build.<username>.properties" (where <username> must match with OS username, for example in Windows OS you can get it by executing "echo %username%" on command prompt) file in your Liferay plugins SDK folder. For example, I created "build.tirthalp.properties" file. Then you can open default "build.xml" file and put required properties to overwrite in "build.<username>.properties" file. For example, I overwritten "app.server.parent.dir=xxxxxxxxxxx", "database.name=lportal62" and "database.types=mysql" to match values with my development setup.


***NOTE - Liferay plugins SDK would facilitate you to create different types of Liferay plugins and deploy it directly in Liferay server using Eclipse IDE, hence ensure doing correct configuration of "build.<username>.properties" file. But at this stage, don't worry about all details of liferay plugins sdk!
  • Start the Liferay server in same way you start any integrated server in Eclipse & wait for 2-5 minutes. On successful server startup, you  would see "server startup in x ms" message in Console. [***NOTE: This step would create "portal-ide.properties" file automatically in root folder of Liferay portal server. E.g. D:\Tirthal-LABs\Liferay\liferay-portal-6.2.0-CE-GA1\portal-ide.properties).
  • Now open "http://localhost:8080/" url in browser and in less than 1-2 minutes you should see default liferay page. Then you can sign-in using default credentials - test@liferay.com / test (email/password).

  • Excellent... You completed one time setup steps for Liferay development environment and ready to develop projects for customization/extension of default features of Liferay portal. Now next step would allow you quickly achieve "Hello World" application in Liferay. Then you can refer Liferay 6.2 Developer's Guide to understand different Liferay plug-ins (such as portlets, themes, layouts, hooks and ext) development methodology.


Step 6 - Hello World portlet application - Create, deploy and test in Liferay server

  • In Eclipse - Create new Liferay Plugin Project as shown below (or alternatively using File -> New -> Liferay Plugin Project).

  • Enter project name as "FirstHelloWorld" and ensure to select the plugin type as "Portlet". Based on previous configurations, other options would be selected automatically such as default location, Plugins type, Liferay runtime. Now click Next.

  • Just click "Finish" to create Liferay MVC portlet project.

  • You would need to wait for few minutes, until it downloads required dependencies using Ivy. At the end you would see "BUILD SUCCESSFUL" message in Console and "FirstHelloWorld-portlet" project in Package Explorer / Navigator view. The project is located in "portlets" folder of your Liferay Plugins SDK project. Before you proceed to next step, again validate that you didn't miss to add "build.<username>.properties file as mentioned in step-5, because that is required to deploy this portlet in Liferay server using SDK as shown in next step.

  • Select "FirstHelloWorld-portlet" and right click Menu would show "Liferay". Click SDK -> deploy.

  • It would build the project and copy "FirstHelloWorld-portlet-6.2.0.1.war" file in Liferay portal server. You would see below messages in Console.

  • In Liferay server log, you should see messages as below. The "1 portlet for FirstHelloWorld-portlet is available for use" message confirms that it registered and deployed successfully in server.

  • Now open "http://localhost:8080/" url in the browser and sign-in using default credentials - test@liferay.com / test (email/password). Then click "+" icon to add created "My First Hello World" portlet application in page of site. Once you add it, you will get some of configuration options for that application. If you sign out, you would not get all such administration options. In short, you already get many out-of-box applications in left panel categories, which you can just add in your page same way you added "My First Hello World" application. It's really easy, so try to add and explore some of out-of-box applications.
  •  


Also Refer
History