This post is part of
Liferay Portal 7 Getting Started Guide Series.
Now, it's time to get started with Liferay IDE for hello world liferay
mvn portlet module development and deployment to Liferay Portal by
following below quick steps.
Liferay Workspace
and Module Project = Newly introduced concept of Liferay 7, and were not in
Liferay 6.2.x or prior versions.
Prerequisite
Create Workspace Project
Liferay Workspace can be used to hold and manage Liferay projects, which is the
official way to create Liferay 7.0 modules using Gradle. Let's create it using
Liferay IDE -> New Liferay Workspace Project -> Give Workspace name and
Finish. This should switch you to "Liferay Workspace" perspective, in
case it was not by default. (In case you lose Liferay Perspective, then set it
again using Window -> Perspective -> Other Perspective..)
While creating new
workspace, don't select "Download liferay bundle" option, as we
consider to deploy our hello world module into locally running Liferay portal
instance which is outside of workspace. Alternatively, if you wish to auto
generate liferay within workspace and deploy modules there, then this option
can be used.
Note: If
you’ve already created a Liferay Workspace and you’d like to import it into
your existing IDE, you can do so by navigating to File -> Import -> Liferay -> Liferay Workspace
Project. Then, click Next and browse for your worspace project. Once
you’ve selected you workspace, click Finish.
After
creating workspace project, let's proceed to create Hello World module project.
Create Hello World MVC
Portlet Module Project
Select
"modules" folder in workspace and use New Liferay Module Project
option to create Liferay Module. Give your choice of project name (i.e.
hello-world-mvc-portlet), select "mvcportlet" in Project Template
name and click Finish. That's it. At this point we have our structure and our
portlet default code underneath the modules folder in the workspace. Just
quickly explore auto-generated code.
Note: If you look at the @
Component's property and you’ve been a Liferay developer, these should
look familiar as they were once XML attributes that were previously in
liferay-portlet.xml, liferay-display.xml, and portlet.xml. The options
available are in liferay-portlet-app_7_0_0.dtd.
Refer
Liferay documentation for more detail. Now, let's proceed to deploy it to Liferay Portal.
Deploy to Liferay Portal
First of all, start
the Liferay portal server, if not yet!
IDE's "Liferay
Workspace" perspective has "Gradle Tasks" view (Gradle is build
tool, in case you don't know). Just click "deploy" option underneath
your module's build category. This should generate "<your-module>.<version>.jar"
file in "build/lib" folder underneath your module project folder
within workspace. Ideally, this step should automatically deploy this jar
bundle in locally running liferay portal on your machine (the way it happens in
"blade deploy" command), however, somehow it's not deploying to
liferay portal on my local setup! Therefore, I'll be showing how to deploy it
manually in next step.
For manual
deployment, just copy the generated portlet's jar file into "deploy"
folder underneath the Liferay Portal Home folder. Then, this jar would
disappeared automatically from deploy folder within few seconds. In console,
you should see this message "… STARTED <your-portlet-module>
[bundle-id]". Actually, Liferay installs this jar underneath
"<TOMCAT_HOME>/osgi/modules" folder of Liferay Portal. See documentation
for more detail.
Add custom Portlet on Site
Page of Portal
Login to Liferay
Portal as admin user. Add your hello world application on page (Add ->
Applications -> Sample -> add portlet application). Additionally, try few
text code changes in "view.jsp" file of hello world module and deploy
again to see how it goes. At the end, if you wish, you can easily
"Remove" custom portlet app from the page too.
Managing Liferay Modules
Projects Lifecycle
Liferay 7.0
architecture offers modularity via OSGI. That means, different modules, so
called OSGI bundles, can have their own lifecycle to start, restart, stop, etc.
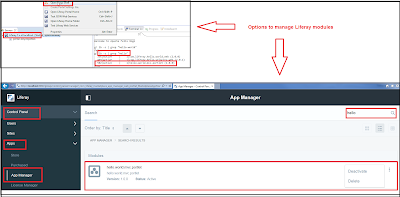
That can be managed using any of below options.
- "Gogo Shell" in IDE. Right-click the started portal in server view and select Open Gogo Shell. For example, one can see list of bundles containing "hello" word using this command: lb -s | grep "hello". See Gogo Shell commands documentation.
- Liferay Administration. Control Panel -> Apps -> App Manager. See documentation for more detail.
What's next?
As an alternate
tooling of Liferay IDE, you may try Blade CLI tool for hello world liferay mvc portlet module development and deployment to Liferay Portal!
- Install Blade CLI.
- Create Workspace: blade init <workspace-name>
- Create Hello World MVC Portlet Application as a Liferay Module: blade create -t mvcportlet -p [package name] -c [class name] [project name]
- At this stage, you would have Gradle based project structure and initial code. Do necessary code changes using your choice of IDE.
- Ensure local liferay portal instance is running on your machine. Deploying Module to Liferay Portal: blade deploy
- Add application on site page by logging to liferay portal as admin user


No comments:
Post a Comment