*** This post is for Liferay Portal 6.2. Do you know, Liferay Portal 7 CE is already released? See Liferay Portal 7 - Getting Started Guide Series. ***
This post is for you - if you are new to Liferay Portal, but you already have enough experience with Java development using Eclipse.
This post is for you - if you are new to Liferay Portal, but you already have enough experience with Java development using Eclipse.
If you are new to
portal, then read what is portal? If you are new to Liferay portal, then read what is Liferay Portal? But most of time, we don't understand all theoretical
fundamentals until we try something practically. So first attempt should be to
setup Liferay environment. There are multiple options available for Liferay Development, which are covered at depth in
developer guide (refer those if you are a beginner java developer).
If you already have
good experience with Eclipse IDE and Java development, you can start with Liferay portal development using Eclipse
just by following below quick steps.
Environment
- Windows 7, Liferay 6.2 CE Bundled with Tomcat, Eclipse Kepler [***NOTE - I have used mentioned
environment, but similar steps should work even if you use different OS or
Eclipse version]
Step 1 - Make sure you have a supported Java JRE and
Eclipse release already installed on your machine
- Java 6.0 JRE or greater.
- Liferay IDE must be run in one of the following Eclipse releases: Eclipse Kepler Java EE (4.3.x), Eclipse Juno Java EE (4.2.x), Eclipse Indigo Java EE (3.7.x)
Step 2 - DownloadLiferay & unzip those in your choice of folder (e.g. you may create "Liferay_LAB" folder)
- Portal Bundled with Tomcat (or your choice of server container) as a Liferay runtime environment --- liferay-portal-tomcat-6.2.0-ce-ga1-20131101192857659.zip
- Plugins SDK (software development kit) to develop custom plugins (e.g. portlets, hooks, ext, themes, layout) and deploy on Liferay server --- liferay-plugins-sdk-6.2.0-ce-ga1-20131101192857659.zip
- Portal Documentation --- liferay-portal-doc-6.2.0-ce-ga1-20131101192857659.zip
- Portal Source Code of CE (community edition) --- liferay-portal-src-6.2.0-ce-ga1-20131101192857659.zip
Step 3 - Setup Liferay Portal
- By default it comes with embedded "HSQL" database. However I recommend to configuration it to use your choice of database such as MySQL or MSSQL (Liferay supports range of databases, but for exact supported version you need to refer "Liferay support matrix").
- Portal custom configuration and change database from default "HSQL" to other database:
- Create new database with name "lportal62" (or any name you can give) in your selected DB.
- Create new "portal-ext.properties" file in root folder of your Liferay portal server (in the unzipped folder of "liferay-portal-tomcat-6.2.0-ce-ga1-20131101192857659.zip").
- Add below configuration in "portal-ext.properties" file (update it as per your settings). Below configuration is for MySQL, but if you select any other then accordingly mention appropriate values of "jdbc.default.driverClassName" and "jdbc.default.url".
#
Liferay portal root folder location
liferay.home=D:/Tirthal-LABs/Liferay/liferay-portal-6.2.0-CE-GA1/
#
MySQL database configuration
jdbc.default.driverClassName=com.mysql.jdbc.Driver
jdbc.default.url=jdbc:mysql://localhost/lportal62?useUnicode=true&characterEncoding=UTF-8&useFastDateParsing=false
jdbc.default.username=xxxxx
jdbc.default.password=xxxxx
- Start Liferay Portal - Go to bin folder in tomcat (e.g. liferay-portal-6.2.0-CE-GA1\tomcat-7.0.42\bin) - Run "startup.bat". Wait… wait… It would take few minutes to create required database tables and start the server. When you start liferay portal for the first time, you would see sequence of events as per below screens.
- Database tables are created.
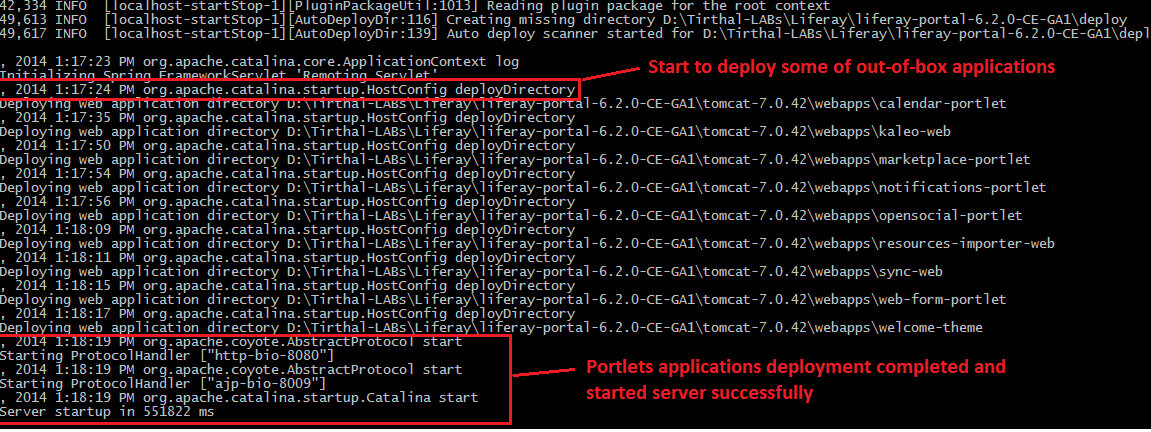
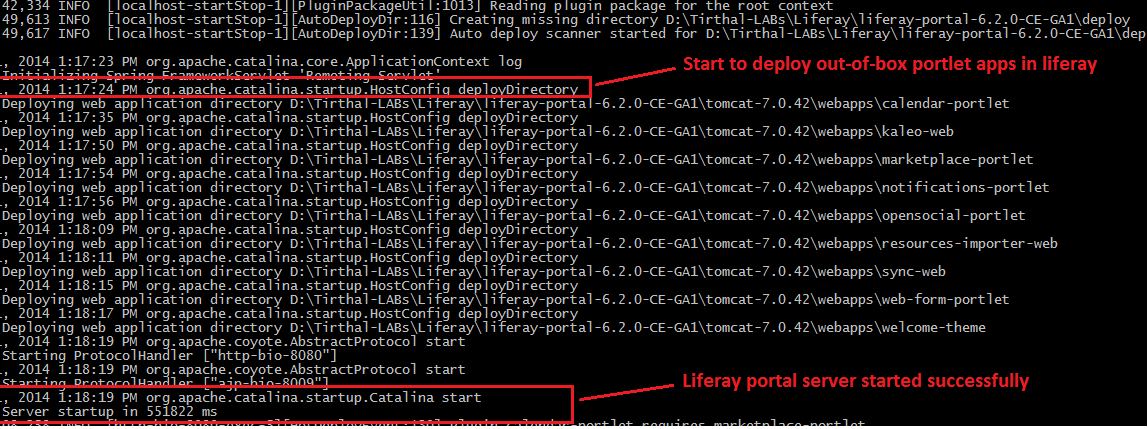
- Some of out-of-box portlet applications are deployed in liferay server and at the end server started successfully.
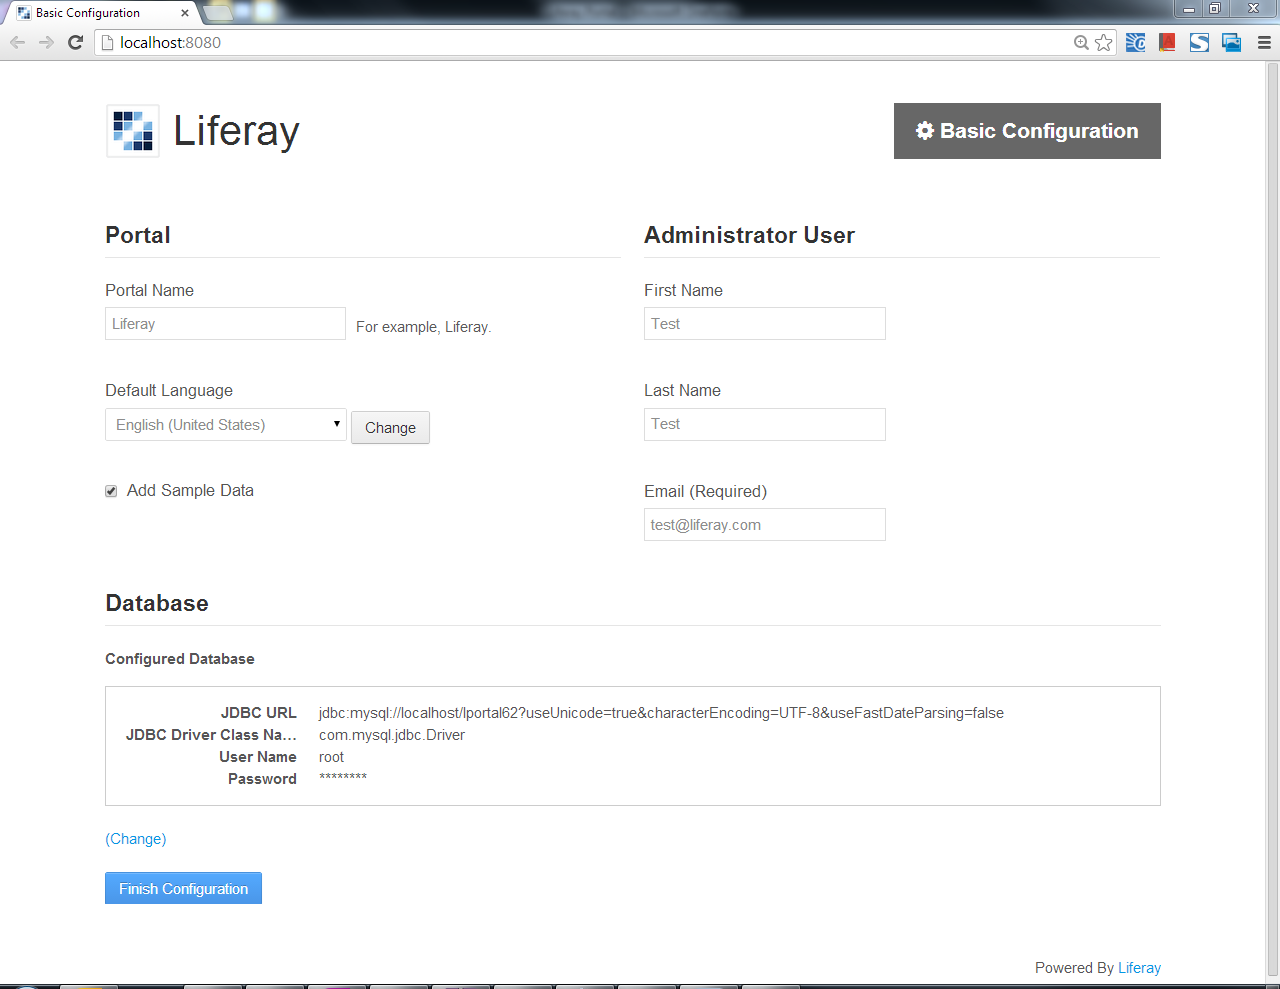
- Automatically it would open browser with default Liferay screen (If you close by mistake, you can always open it using http://localhost:8080/ url). Now you just validate click "Finish Configuration", which would again take few minutes.
- Now you would see "finished adding data" message.
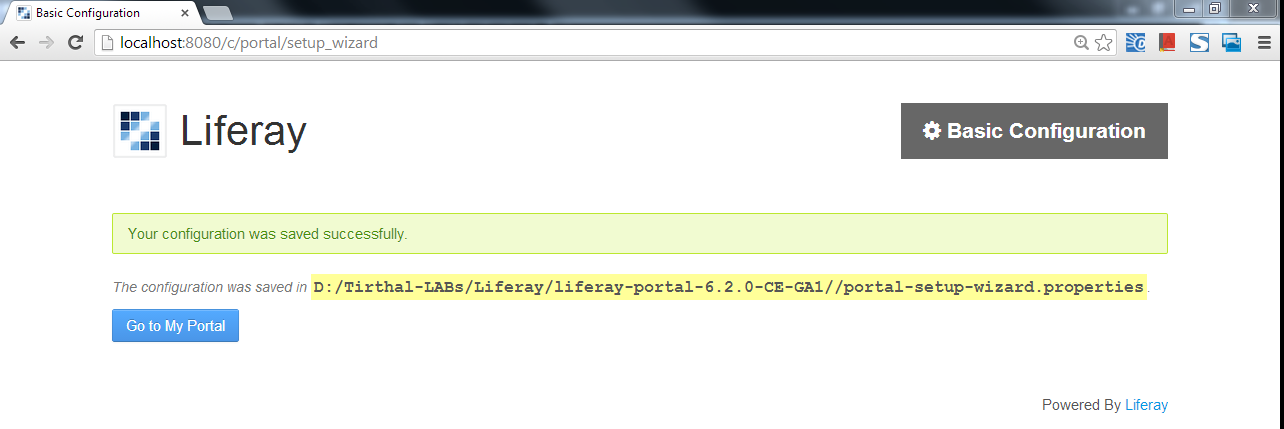
- Then you would see this page in browser (showing file location where it saved setup wizard settings). Next you just need to click "Go to My Portal".
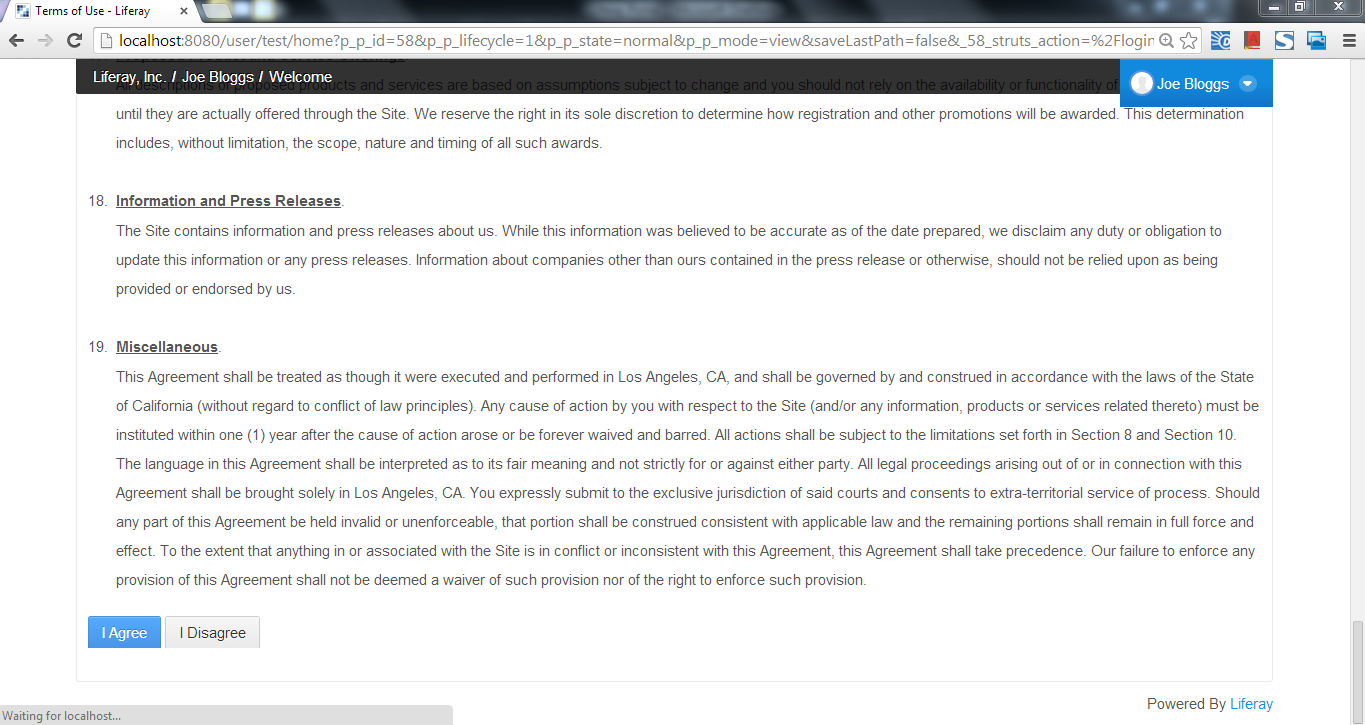
- Now click "Agree" button and then in next screen save "Password Reminder" answer.
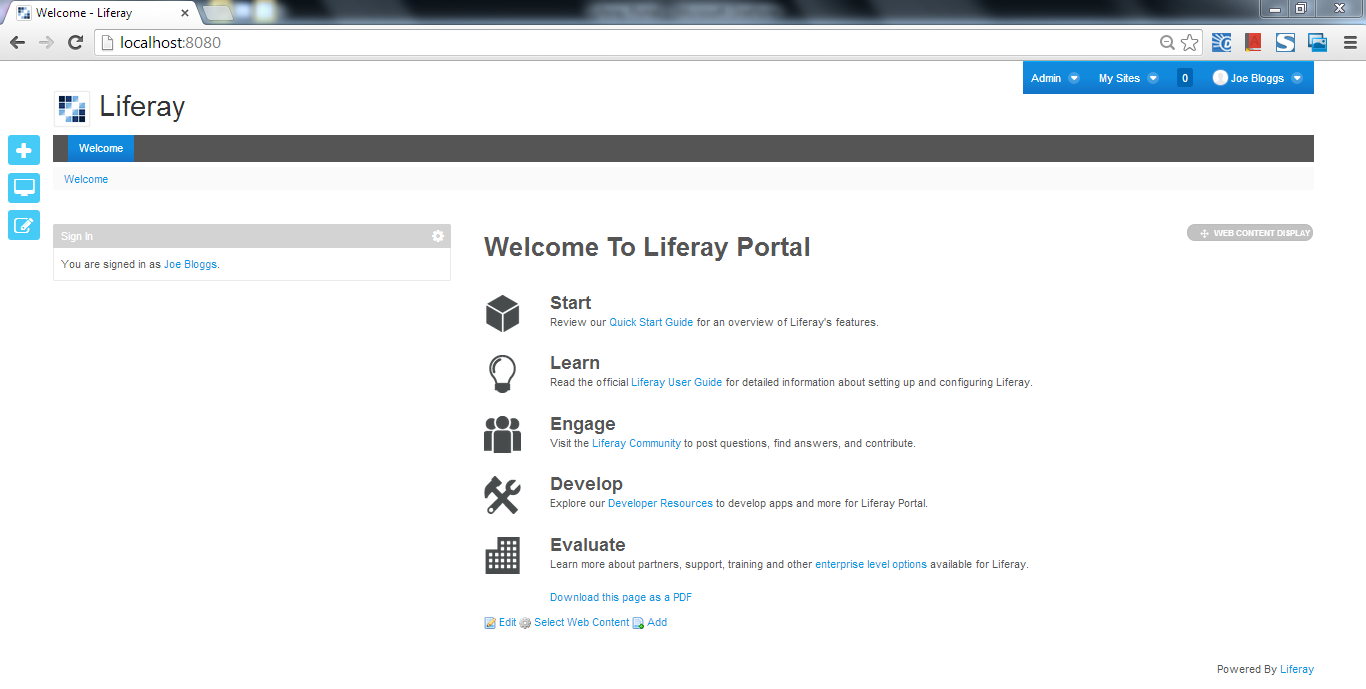
- Congratulations… Finally you would get "Welcome" page of Liferay. If you wish to explore out-of-the-box (OOTB) features of Liferay 6.2, then you can refer Liferay 6.2 User Guide.

- Stop Liferay Portal - Go to bin folder in tomcat (e.g. liferay-portal-6.2.0-CE-GA1\tomcat-7.0.42\bin) - Run "shutdown.bat". In 2-3 minutes, it would stop server and close the command prompt. That's it. [***NOTE - Stop server without fail, as in next step we'll integrate it in Eclipse IDE to start/stop using Eclipse during development.]
Step 4 - Install Liferay Plugins in your Eclipse IDE
(3.7 or greater) in same way you install other Eclipse plugins
- The Liferay Eclipse plugins would allow you to integrate Liferay portal server and Liferay plugins SDK with Eclipse IDE. So you can control Liferay plugins projects development and deployment using Eclipse IDE.
- Go to Help - Install New Software… - Enter the update site URL - http://sourceforge.net/projects/lportal/files/Liferay%20IDE/2.0.1%20GA2/updatesite/
- On successful Liferay plugins installation, you would see those in Eclipse IDE as per below screen. Now you can switch to Liferay perspective using Windows -> Open Perspective -> Other -> Select Liferay.
- IMPORTANT NOTE: Firstly I tried "IDE 2.0.0.GA1" in Eclipse Kepler and could install it without any error, but IDE 2.0.0.GA1 was causing problems to open default page of liferay in browser even if liferay server started successfully. Finally "IDE 2.0.1.GA2" installation worked perfectly in Eclipse Kepler. However you can always refer to Liferay IDE page for latest updates - http://www.liferay.com/downloads/liferay-projects/liferay-ide.
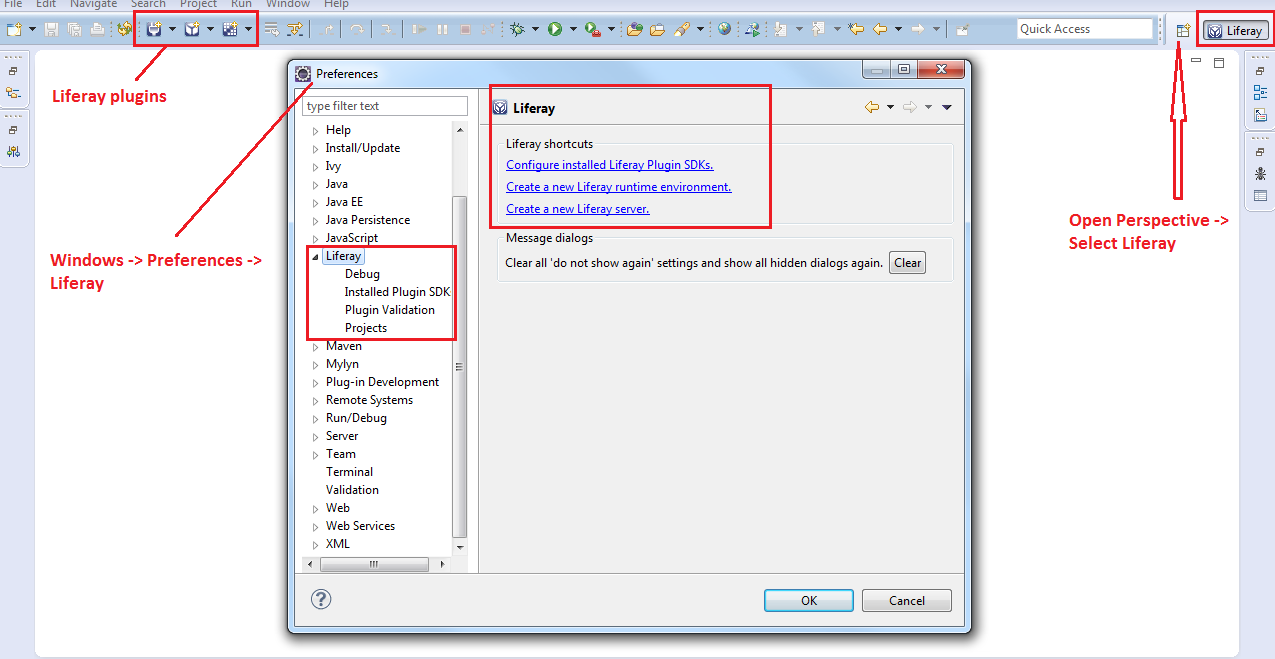
Step 5 - Setup Eclipse IDE for Liferay Development
Environment
- Configure new Liferay Server = Windows -> Preferences -> Liferay -> Create new Liferay Server -> Select Liferay v6.2 CE Server (Tomcat7) and click Next -> Select Liferay Tomcat directory and click Next -> Select Liferay Javadoc and source code -> click Finish.
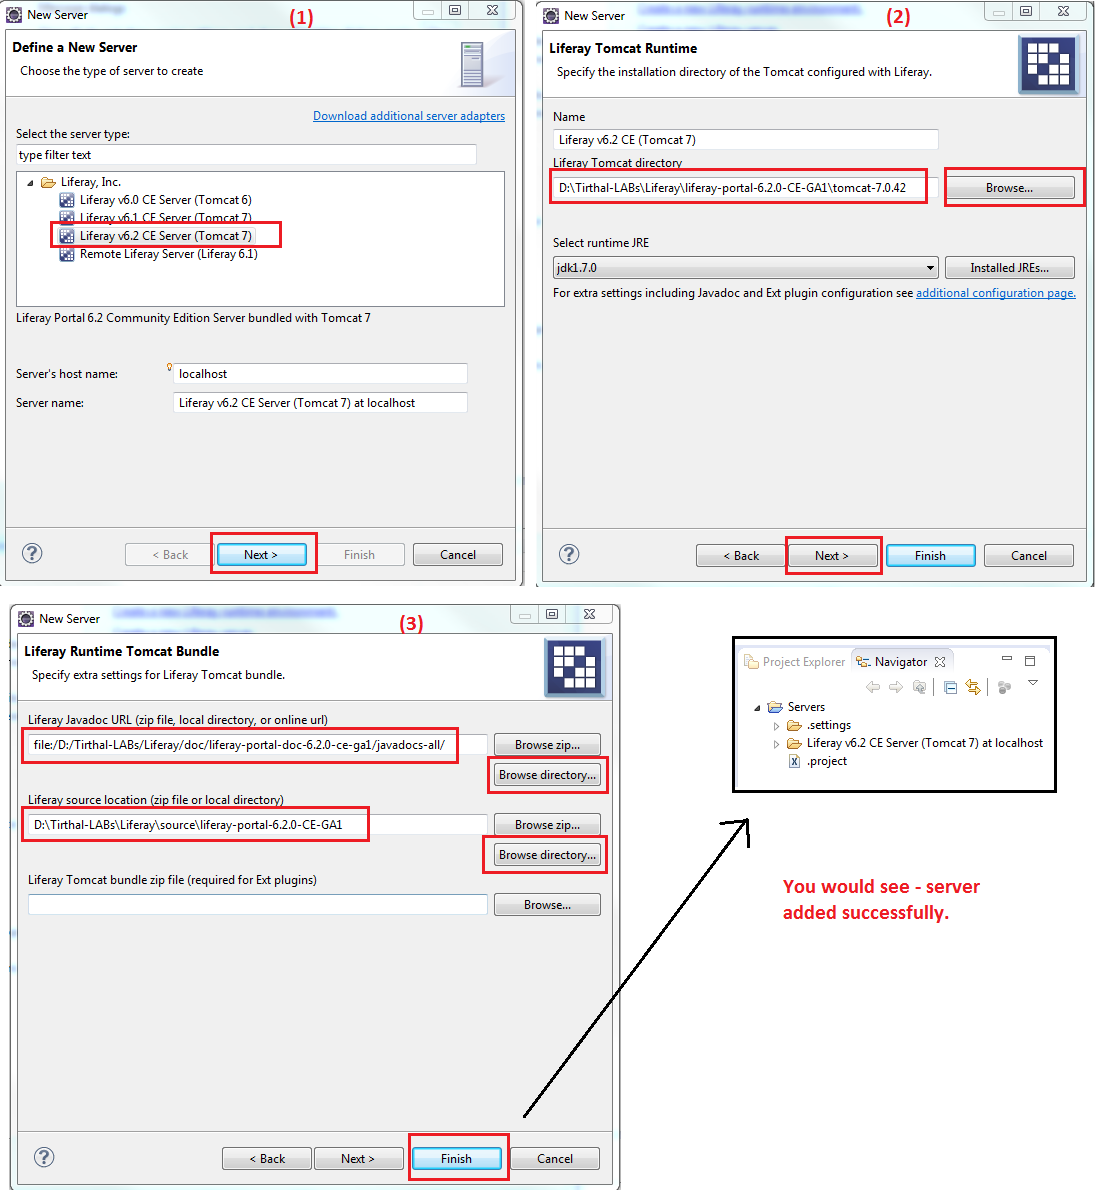
- Configure new Liferay Plugin SDK = Windows -> Preferences -> Liferay -> Installed Plugin SDK -> Add (configure unzipped Liferay plugin SDK folder o n your machine as per below screen) -> OK.
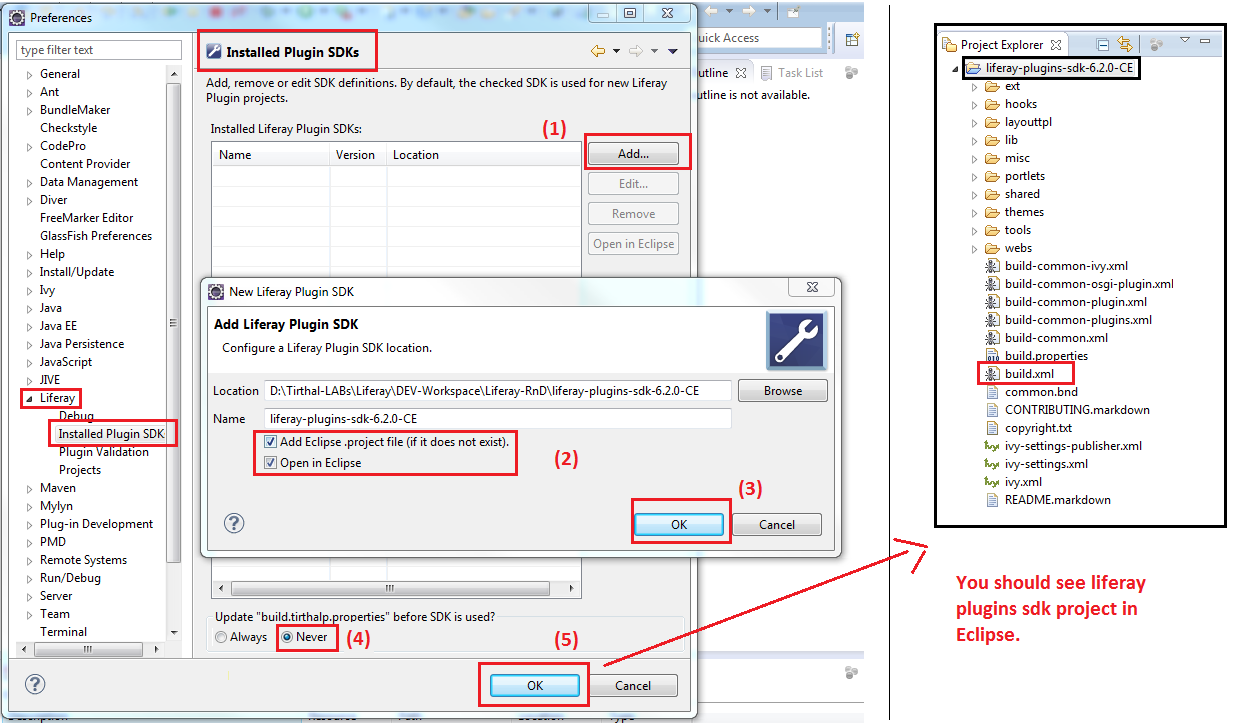
Now
create a new "build.<username>.properties" (where
<username> must match with OS username, for example in Windows OS you can
get it by executing "echo %username%" on command prompt) file in your
Liferay plugins SDK folder. For example, I created
"build.tirthalp.properties" file. Then you can open default
"build.xml" file and put required properties to overwrite in
"build.<username>.properties" file. For example, I overwritten
"app.server.parent.dir=xxxxxxxxxxx",
"database.name=lportal62" and "database.types=mysql" to
match values with my development setup.
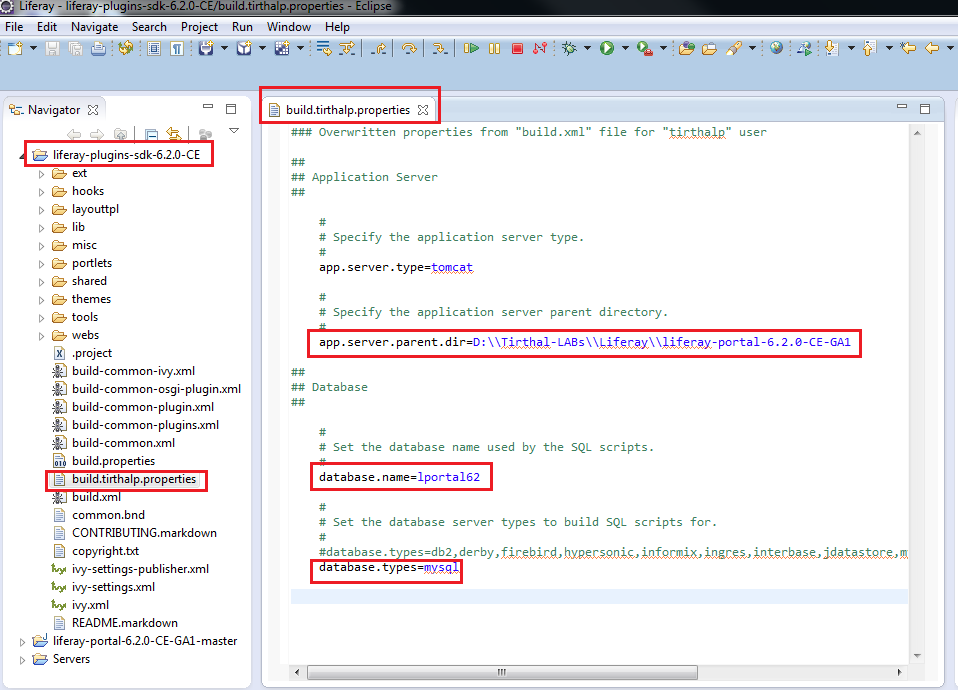

***NOTE - Liferay plugins SDK would
facilitate you to create different types of Liferay plugins and deploy it
directly in Liferay server using Eclipse IDE, hence ensure doing correct
configuration of "build.<username>.properties" file. But at this
stage, don't worry about all details of liferay plugins sdk!
- Start the Liferay server in same way you start any integrated server in Eclipse & wait for 2-5 minutes. On successful server startup, you would see "server startup in x ms" message in Console. [***NOTE: This step would create "portal-ide.properties" file automatically in root folder of Liferay portal server. E.g. D:\Tirthal-LABs\Liferay\liferay-portal-6.2.0-CE-GA1\portal-ide.properties).

- Now open "http://localhost:8080/" url in browser and in less than 1-2 minutes you should see default liferay page. Then you can sign-in using default credentials - test@liferay.com / test (email/password).
- Excellent... You completed one time setup steps for Liferay development environment and ready to develop projects for customization/extension of default features of Liferay portal. Now next step would allow you quickly achieve "Hello World" application in Liferay. Then you can refer Liferay 6.2 Developer's Guide to understand different Liferay plug-ins (such as portlets, themes, layouts, hooks and ext) development methodology.
Step 6 - Hello World portlet application - Create,
deploy and test in Liferay server
- In Eclipse - Create new Liferay Plugin Project as shown below (or alternatively using File -> New -> Liferay Plugin Project).
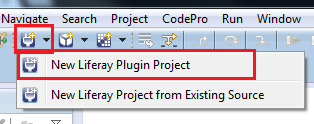
- Enter project name as "FirstHelloWorld" and ensure to select the plugin type as "Portlet". Based on previous configurations, other options would be selected automatically such as default location, Plugins type, Liferay runtime. Now click Next.
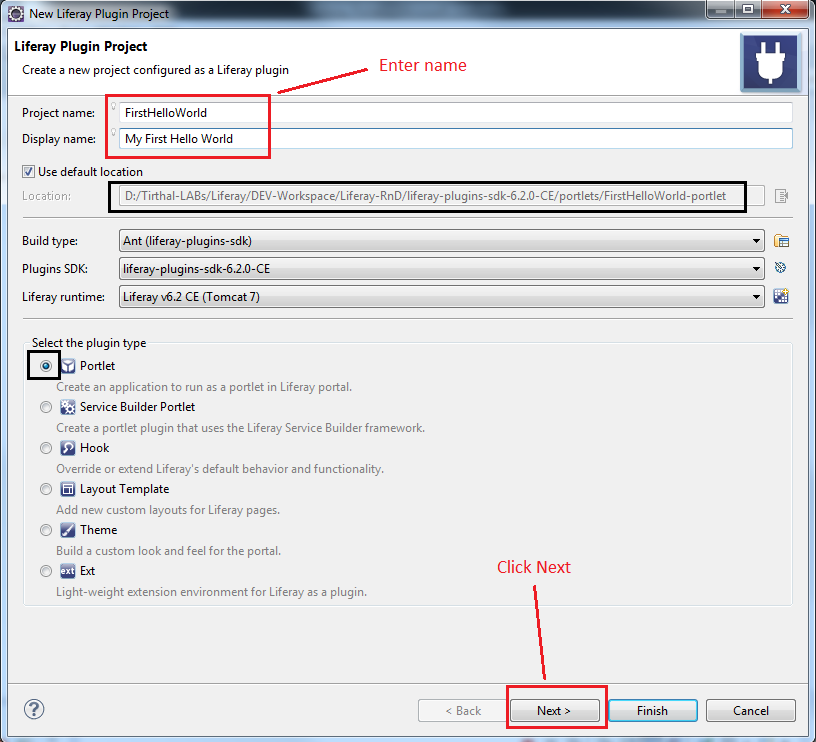
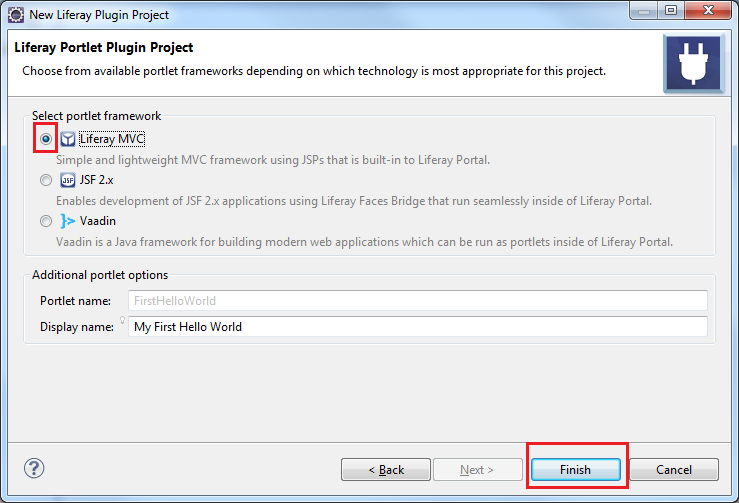
- Just click "Finish" to create Liferay MVC portlet project.
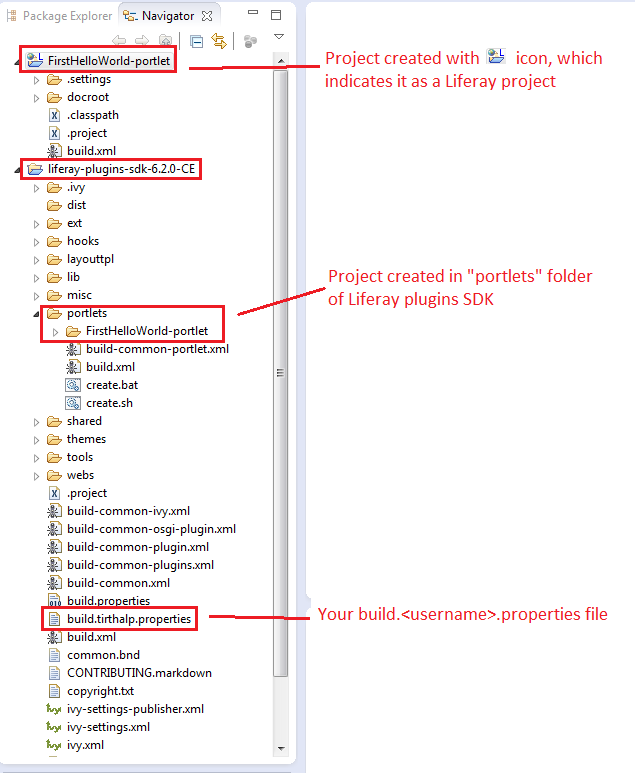
- You would need to wait for few minutes, until it downloads required dependencies using Ivy. At the end you would see "BUILD SUCCESSFUL" message in Console and "FirstHelloWorld-portlet" project in Package Explorer / Navigator view. The project is located in "portlets" folder of your Liferay Plugins SDK project. Before you proceed to next step, again validate that you didn't miss to add "build.<username>.properties file as mentioned in step-5, because that is required to deploy this portlet in Liferay server using SDK as shown in next step.
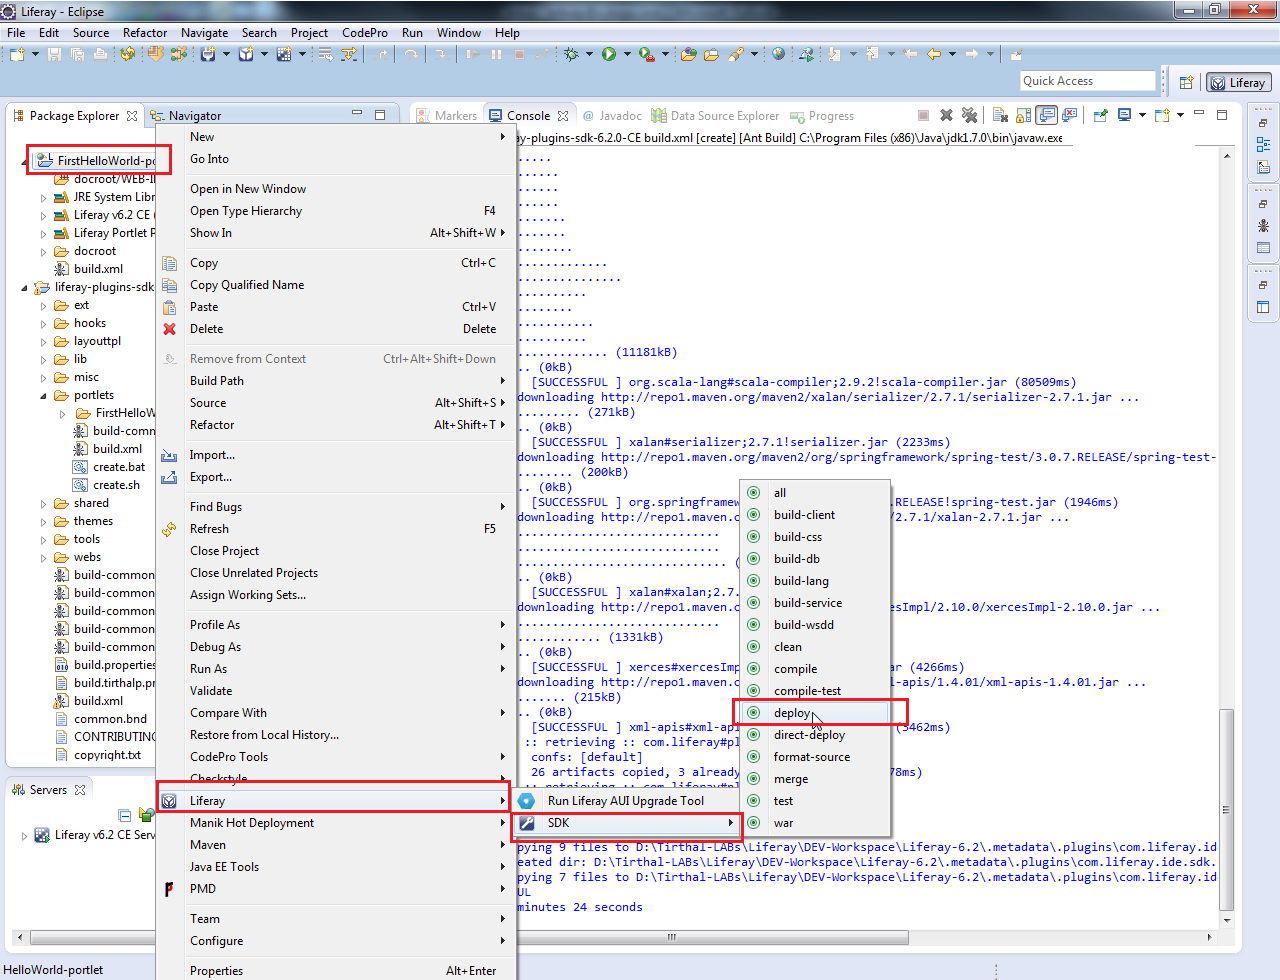
- Select "FirstHelloWorld-portlet" and right click Menu would show "Liferay". Click SDK -> deploy.
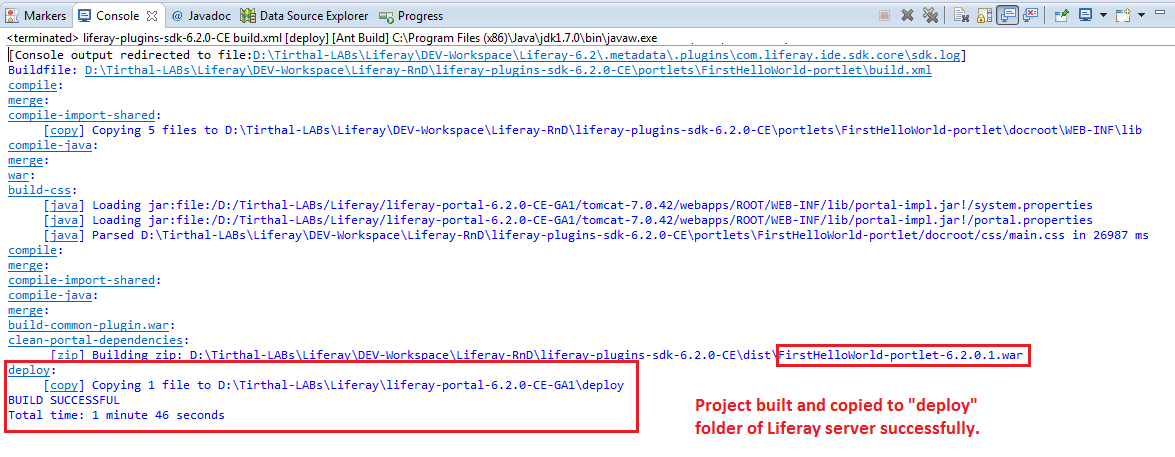
- It would build the project and copy "FirstHelloWorld-portlet-6.2.0.1.war" file in Liferay portal server. You would see below messages in Console.
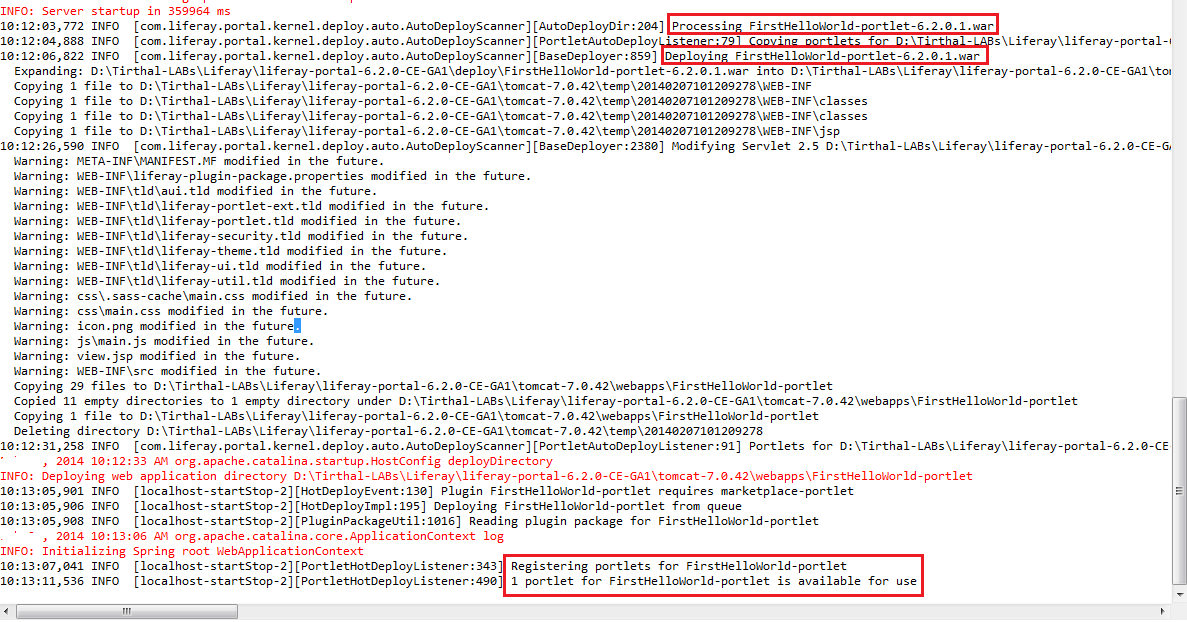
- In Liferay server log, you should see messages as below. The "1 portlet for FirstHelloWorld-portlet is available for use" message confirms that it registered and deployed successfully in server.
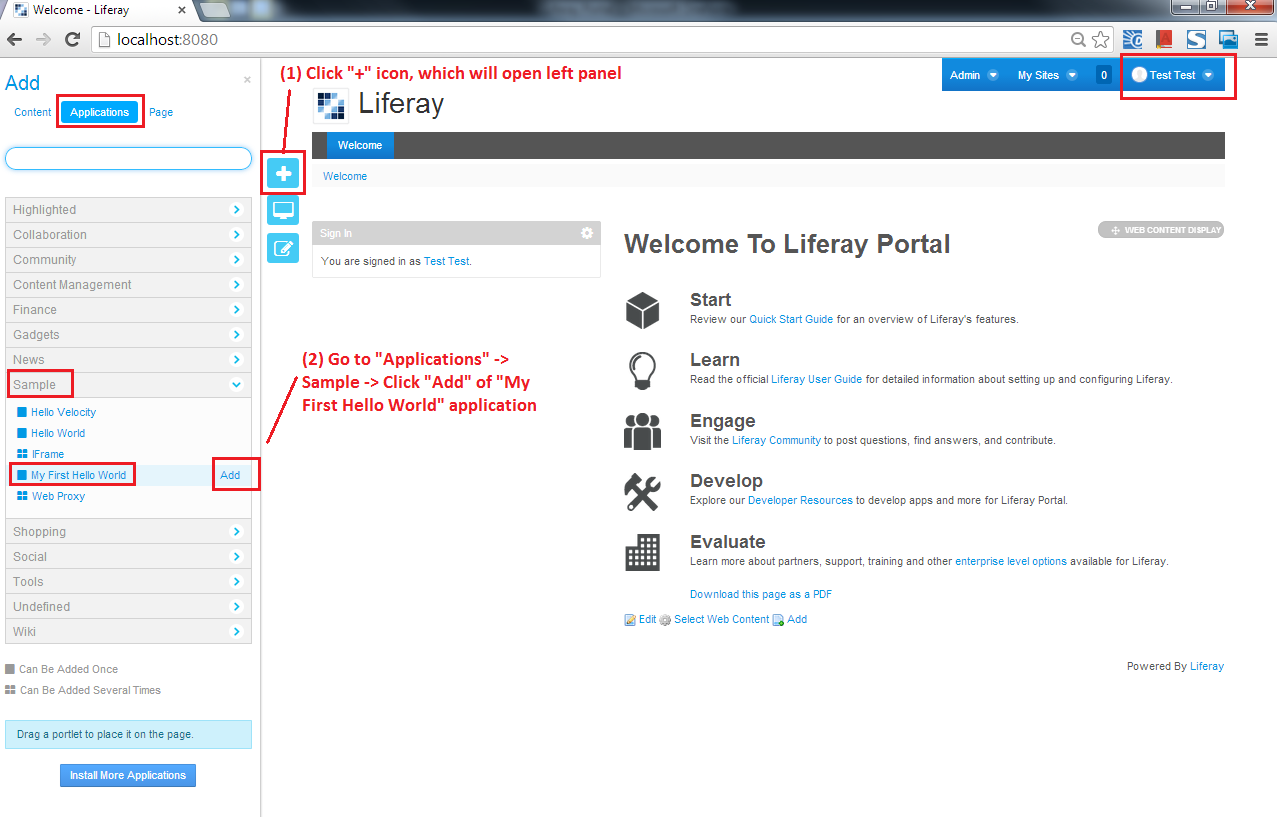
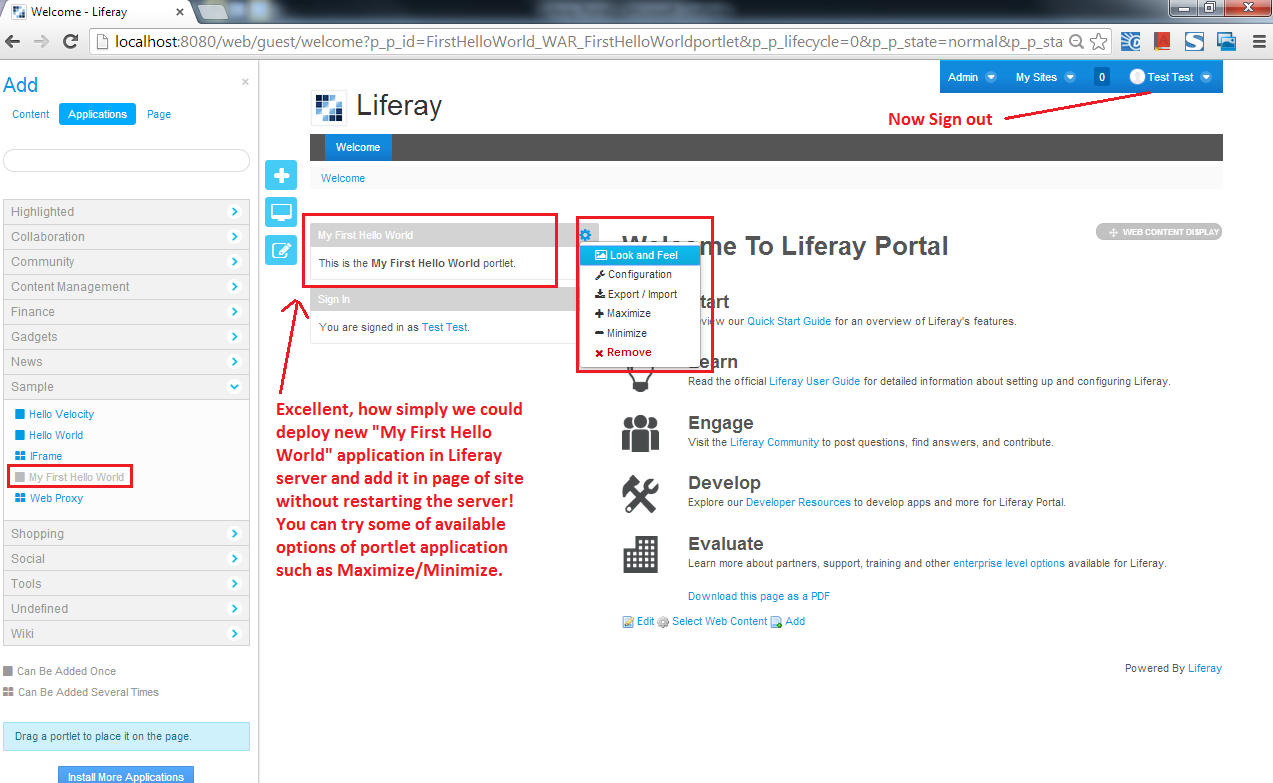
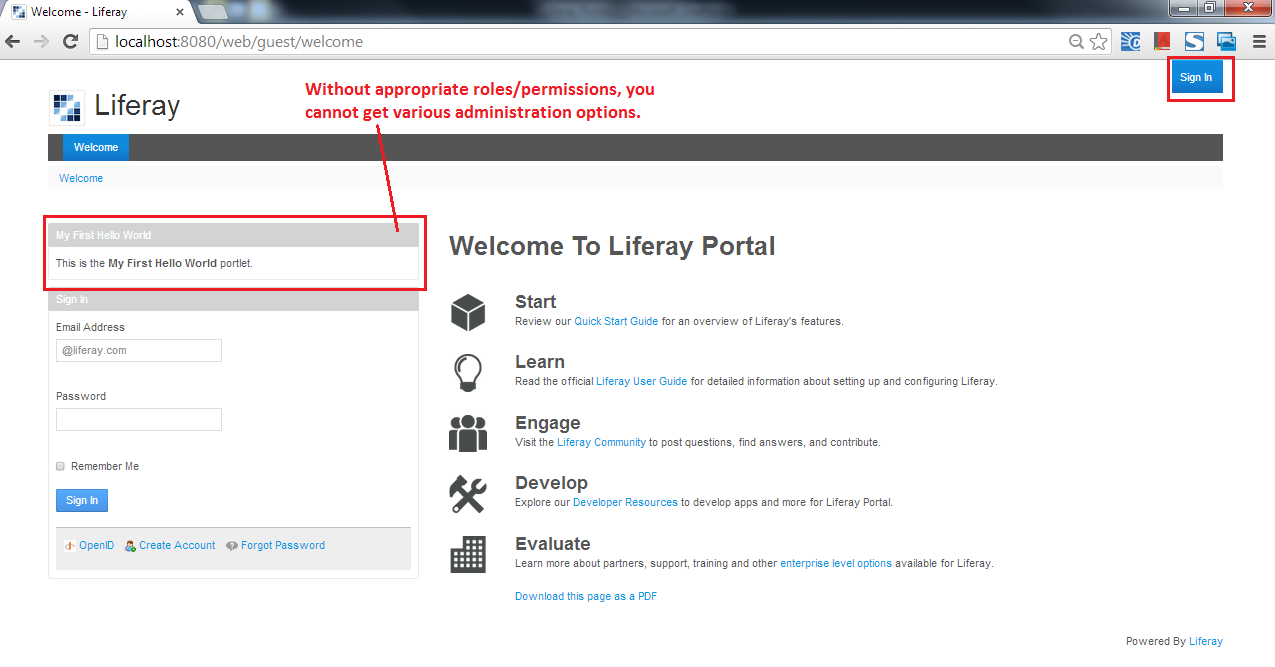
- Now open "http://localhost:8080/" url in the browser and sign-in using default credentials - test@liferay.com / test (email/password). Then click "+" icon to add created "My First Hello World" portlet application in page of site. Once you add it, you will get some of configuration options for that application. If you sign out, you would not get all such administration options. In short, you already get many out-of-box applications in left panel categories, which you can just add in your page same way you added "My First Hello World" application. It's really easy, so try to add and explore some of out-of-box applications.
Also Refer
- Liferay 6.2 Overview Video - http://www.liferay.com/video?title=video-web-event-liferay-portal-6-2-overview
- Liferay 6.2 User Guide - http://www.liferay.com/documentation/liferay-portal/6.2/user-guide
- Liferay 6.2 Administration Guide - http://www.liferay.com/documentation/liferay-portal/6.2/development
- 1-Oct-2016: Added reference for Liferay Portal 7 - Getting Started Guide Series.


Excellent. Thanks for sharing detailed steps.
ReplyDeleteThank you.. your blog helped me in setting up liferay easily
ReplyDeleteI am glad to know that this post is helping. May be I can consider writing "Liferay Portal - Learning Made Easy" series in future, if that helps!
ReplyDeleteHi in Step 5 - Setup Eclipse IDE for Liferay Development Environment. In the last part, where can I see javadocs and source code? Is it in the Liferay sbufolders too? I cant find it please help me. Im using Liferay 6.2. Thanks
ReplyDeletePlease refer step 2 - http://www.liferay.com/downloads/liferay-portal/available-releases - from Have you downloaded javadoc and sourcecode of Liferay 6.2 & unzip those?
DeleteDirect download links are -
http://sourceforge.net/projects/lportal/files/Liferay%20Portal/6.2.1%20GA2/liferay-portal-doc-6.2-ce-ga2-20140321115737138.zip/download
http://sourceforge.net/projects/lportal/files/Liferay%20Portal/6.2.1%20GA2/liferay-portal-src-6.2-ce-ga2-20140319114139101.zip/download
I think, I had changed those unzipped folders names a bit. So that might have confused you. Let me know, if you need more info.
Here is the Liferay portal source code on Github - https://github.com/liferay/liferay-portal
DeleteNote: You can also import it into Eclipse, as Liferay Portal source is Eclipse based project.
Thanks for sharing tutorial on Liferay Portal 6.2concepts. Your post is very helpful to Java students and fresher looking for excellent tutorial on java. Myself working as trainer in reputed Java training institute in Chennai, you article is very helpful.
ReplyDeleteDo you have some tutorial on LR and Maven ?
ReplyDeleteNo, I don't have. I did it in past by following the steps given in LR documentation (https://www.liferay.com/documentation/liferay-portal/6.2/development/-/ai/developing-plugins-using-maven-liferay-portal-6-2-dev-guide-02-en). What problem are you facing?
DeleteHi Dax for Maven with liferay you may visit
Deletehttp://liferayiseasy.blogspot.in/2015/02/creating-portlet-and-services-using.html
The Information which you provided is very much useful for JAVA Training Learners Thank You for Sharing Valuable Information.i like this blog and this is very informative.
ReplyDeleteJAVA Training
Hi Tirthal,
ReplyDeleteI have configured eclipse kepler with Liferay JBoss bundle, and have configured the Pug in SDK also. I created a new Liferay Pulgin Project which is getting deployed successfully, but its not visible in the Sample Catogory. I can see the WAR file in the deployments folder of JBoss. If I am using the Tomcat bundle I am able to see the Portlet in the Samples category.. Then why the same is not visible when I use JBoss bundle..Please help me in this. I am new to Liferay..
Hi Geetha,
DeleteCould you solve the mentioned problem by now or is it still the same? Generally speaking, it should work if your setup is appropriate. If you provide exact Liferay Portal and SDK, I can check and may help you.
Also I suggest to check below things,
(1) Liferay log file to confirm that portlet registered and deployed successfully in server, something like "1 portlet for Xyz-portlet is available for use" message .
(2) By default it goes under "sample" category. You may create a file "liferay-display.xml" in WEB-INF folder of portlet and configure custom category for your portlet (as shown here - https://www.liferay.com/documentation/liferay-portal/6.2/development/-/ai/anatomy-of-a-portlet-project-liferay-portal-6-2-dev-guide-03-en). For example, refer point 7 for adding custom category in "display" element of "liferay-display.xml" file here - https://www.liferay.com/community/wiki/-/wiki/Main/How+to+create+a+simple+portlet.
Good work!
ReplyDeleteExcellent post!!! Your article helped to under the future of java development. Being an open source platform, java is integrated in most of the software development industries to create rich featured applications. Java Training
ReplyDeleteI am following your blog from the beginning, it was so distinct & I had a chance to collect conglomeration of information that helps me a lot to improvise myself. I hope this will help many readers who are in need of this vital piece of information. Thanks for sharing & keep your blog updated.JAVA Training in Chennai
ReplyDeleteThis comment has been removed by the author.
ReplyDeleteNice post .For tutorials on Service builder,hooks and other topics you may visit
ReplyDeleteLiferay Tutorials
good job!thx!
ReplyDeleteNice Post.It would be great if you provide more details about it.
ReplyDeleteJava Training in Chennai
Nice tutorial!
ReplyDeleteI have make some new liferay theme, you can download free at www.liferaytheme.com
Thank you great tutorial. However if you're facing with project creation problem you should check this question out:
ReplyDeletehttp://stackoverflow.com/questions/31921996/cannot-create-liferay-plugin-project-type-unknown-not-present
The information you have given here are most worthy for me. I have implemented in my training program as well, thanks for sharing.
ReplyDeleteBig Data Training in Chennai
Big Data Course in Chennai
This helped a lot,,, I've been stuck on the liferay ide part as it always gives me 6.1 tomcat runtime,,, when I used your updatesite it worked first try.. Very helpful thanks a lot
ReplyDeleteI am glad to know, this post helped you. Thanks for your comment.
Deleteoh by the way I'm using 6.2 portal and plugins sdk,, that's why having 6.1 runtime by default is really a pain hahaha,,,
ReplyDeleteVideo guide install liferay 6.2 https://www.youtube.com/watch?v=I9qjRPS1QJw
ReplyDeletewonderful information, I had come to know about your blog from my friend nandu , hyderabad,i have read atleast 7 posts of yours by now, and let me tell you, your website gives the best and the most interesting information. This is just the kind of information that i had been looking for, i'm already your rss reader now and i would regularly watch out for the new posts, once again hats off to you! Thanks a ton once again, liferay training in hyderabad
ReplyDeleteI followed all the stpes mentioned as above but the tables are not creating after we run the "startup" batch file. command prompt is opening and closing immediately without creating any tables. can some one help me at this.
ReplyDeleteI guess, you might have double clicked startup batch. Try this - Open Command Prompt (cmd.ext with Run as administrator privilege). Go to Liferay's tomcat bin directory and run "startup.bat". This should not close command prompt automatically.
DeleteHi Tirthal,
ReplyDeleteI amfacing an issue.
I logged in as admin and I have created new site site under organization org1, assigned the users user1 to it. Is there a way to restrict the same site should not be available to admin of other organization org2 ?
I tried to create private/restricted site under org1 but its still appearing for the org2. Is there a way to restrict the site1 should not be available to Org2.
Second issue, is there a way to restrict the users existing under org1 should not be available to admin of org2.
I had the option to discover great data from your blog articles.best interiors
ReplyDelete