Sunday, 27 November 2016

Docker Toolbox on Windows: Mount any host directory (other than Users directory in c drive) as a data volume

This post is for you, if you are looking for mounting a host directory (which is not underneath the "C:\Users" folder) as a data volume in docker container using Docker Toolbox on Windows.

Problem Statement:


As per docker documentation --- "If you are using Docker Machine on Mac or Windows, your Docker Engine daemon has only limited access to your OS X or Windows filesystem. Docker Machine tries to auto-share your /Users (OS X) or C:\Users (Windows) directory. So, you can mount files or directories on OS X using".

This means, you can mount anything underneath "c:\Users" directory of host your Windows machine as a data volume in docker container seamlessly. For example, let's say you want to dump some data from "c:\Users\tirthalp\data" directory to "data" directory within Redis container in docker. Well, below just executing command will enable you to do it.

docker run -v /c/Users/tirthalp/.docker/data:/data --name <container-name> <image-name>


But, what is there is a need of mounting other folders (any folder which is not underneath "c:\Users" directory) of your Windows machine as a data volume in docker container? Well, that's not a piece of cake. For example, if you execute below command, the container would not complain. But actually mounting of folder in D drive as a data volume could not happen and data from your host Windows machine would not be accessible in docker container.

docker run -v /d/x-temp/data:/data --name <container-name> <image-name>


Solution:

I could not locate official docker documentation on this. After giving few tries, finally these steps worked --- add a shared folder to Docker Host VM and mount it as a data volume. Although the given steps are pretty clear, I thought to share screenshots of the same as following.

Step 1: Stop Docker Machine


Step 2: Add Shared Folder in Oracle VirtualBox Manager

Open Oracle VM VirtualBox Manager. Settings -> Shared Folder -> Add Share Folder (i.e. Tirthal-LABs).


Step 3: Permanently mount VirtualBox shared folder as a shared-data volume in Docker machine

Start docker machine.


SSH to docker machine, create directory in docker machine (i.e. /home/docker/tirthal-projects) and mount VirtualBox shared folder name (i.e. Tirthal-LABs) with it. This should enable you to access host Windows machine's data in docker machine @ /home/docker/tirthal-projects.


Try restarting docker machine. Now if you check at /home/docker/tirthal-projects, you would not see mounted host machine's data. For permanent mounting, add following two lines at the end of profile --- sudo vi /mnt/sda1/var/lib/boot2docker/profile

mkdir /home/docker/<directory-name>
sudo mount -t vboxsf -o uid=1000,gid=50 <virtual-box-shared-folder-name> /home/docker/<directory-name>


Try restarting docker machine again. Now if you check at /home/docker/tirthal-projects, you would not see mounted host machine's data.


Step 4: Mount a shared-storage volume as a data volume

Now you should be able to mount even other than "c:\Users" directories of host Windows machine in docker container as a data volume, if you have completed the above steps 1 to 3 successfully. For example, following command would mount "data" folder in container with a shared-storage "/home/docker/tirthal-projects/temp" on docker machine. Here, the "/home/docker/tirthal-projects" is mounted with the host Window machine's folder (i.e. D:\Tirthal-LABs\).
docker run -v /home/docker/tirthal-projects/temp:/data --name <container-name> <image-name>


References:


Sunday, 25 September 2016

Liferay Portal 7 - Getting Started Guide Series

I had written step by step post for LiferayPortal 6.2 - Getting Started Guide - Development Setup using Eclipse Kepler in past. Today, I thought to write series of posts for getting started with recently released Liferay Portal 7 CE, which has major changes with respect to introducing modular architecture and related development strategy.

If you are new to portal, then read what is portal? If you are new to Liferay, then read what is Liferay Portal (now broadly known as Liferay Digital Experience Platform)? But most of time, we don't understand all theoretical fundamentals until we have environment to try something practically. So first attempt can be to setup latest Liferay portal to try its few out-of-box features and functionalities. Then, further attempts can be setup Liferay IDE for creating hello world project and deploying to Liferay Portal.

Following series of posts may help you to get started with Liferay Portal 7 quickly, if you already have experience with Java development using Eclipse.
  1. Step by step guide to setup Liferay Portal
  2. Understanding Liferay Development Tooling options
  3. Basic setup of Liferay IDE
  4. Using Liferay IDE for Hello World Liferay MVC Portlet development and deployment

For now, enjoy these posts. I may add few more to the above list in future!

Also Refer
  • Liferay 7 Features from Developer Perspective
    • OSGi Support
    • Bootstrap 3.0 Look and Feel
    • Java 8 Support
    • Alloy Editor
    • Elastic Search
    • Support Integration Testing through Arquillian
    • Application Display Templates Support for Login, Language and Breadcrumb portlets.
    • Improvements in Web content management
    • Singe Page Application Development
    • Document Management storages extracted as modules      
    • Service Builder code now uses Declarative Services instead of Spring for dependency injection

Liferay Portal 7 - Getting Started Guide - Hello World Portlet Module using Liferay IDE


Now, it's time to get started with Liferay IDE for hello world liferay mvn portlet module development and deployment to Liferay Portal by following below quick steps.

Liferay Workspace and Module Project = Newly introduced concept of Liferay 7, and were not in Liferay 6.2.x or prior versions.

Prerequisite

Create Workspace Project

Liferay Workspace can be used to hold and manage Liferay projects, which is the official way to create Liferay 7.0 modules using Gradle. Let's create it using Liferay IDE -> New Liferay Workspace Project -> Give Workspace name and Finish. This should switch you to "Liferay Workspace" perspective, in case it was not by default. (In case you lose Liferay Perspective, then set it again using Window -> Perspective -> Other Perspective..)

While creating new workspace, don't select "Download liferay bundle" option, as we consider to deploy our hello world module into locally running Liferay portal instance which is outside of workspace. Alternatively, if you wish to auto generate liferay within workspace and deploy modules there, then this option can be used.

Note: If you’ve already created a Liferay Workspace and you’d like to import it into your existing IDE, you can do so by navigating to File -> Import -> Liferay -> Liferay Workspace Project. Then, click Next and browse for your worspace project. Once you’ve selected you workspace, click Finish.

After creating workspace project, let's proceed to create Hello World module project.

Create Hello World MVC Portlet Module Project

Select "modules" folder in workspace and use New Liferay Module Project option to create Liferay Module. Give your choice of project name (i.e. hello-world-mvc-portlet), select "mvcportlet" in Project Template name and click Finish. That's it. At this point we have our structure and our portlet default code underneath the modules folder in the workspace. Just quickly explore auto-generated code.

Note: If you look at the @ Component's property and you’ve been a Liferay developer, these should look familiar as they were once XML attributes that were previously in liferay-portlet.xml, liferay-display.xml, and portlet.xml. The options available are in liferay-portlet-app_7_0_0.dtd.

Refer Liferay documentation for more detail. Now, let's proceed to deploy it to Liferay Portal.

Deploy to Liferay Portal

First of all, start the Liferay portal server, if not yet!

IDE's "Liferay Workspace" perspective has "Gradle Tasks" view (Gradle is build tool, in case you don't know). Just click "deploy" option underneath your module's build category. This should generate "<your-module>.<version>.jar" file in "build/lib" folder underneath your module project folder within workspace. Ideally, this step should automatically deploy this jar bundle in locally running liferay portal on your machine (the way it happens in "blade deploy" command), however, somehow it's not deploying to liferay portal on my local setup! Therefore, I'll be showing how to deploy it manually in next step.

For manual deployment, just copy the generated portlet's jar file into "deploy" folder underneath the Liferay Portal Home folder. Then, this jar would disappeared automatically from deploy folder within few seconds. In console, you should see this message "… STARTED <your-portlet-module> [bundle-id]". Actually, Liferay installs this jar underneath "<TOMCAT_HOME>/osgi/modules" folder of Liferay Portal. See documentation for more detail.


Add custom Portlet on Site Page of Portal

Login to Liferay Portal as admin user. Add your hello world application on page (Add -> Applications -> Sample -> add portlet application). Additionally, try few text code changes in "view.jsp" file of hello world module and deploy again to see how it goes. At the end, if you wish, you can easily "Remove" custom portlet app from the page too.


Managing Liferay Modules Projects Lifecycle

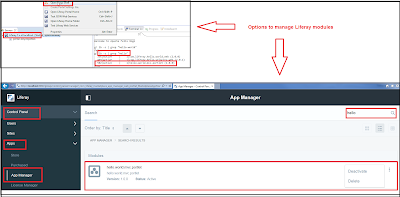
Liferay 7.0 architecture offers modularity via OSGI. That means, different modules, so called OSGI bundles, can have their own lifecycle to start, restart, stop, etc. That can be managed using any of below options.
  • "Gogo Shell" in IDE. Right-click the started portal in server view and select Open Gogo Shell. For example, one can see list of bundles containing "hello" word using this command: lb -s | grep "hello". See Gogo Shell commands documentation.
  • Liferay Administration. Control Panel -> Apps -> App Manager. See documentation for more detail.


What's next?


  1. Install Blade CLI.
  2. Create Workspace: blade init <workspace-name>
  3. Create Hello World MVC Portlet Application as a Liferay Module: blade create -t mvcportlet -p [package name] -c [class name] [project name]
  4. At this stage, you would have Gradle based project structure and initial code. Do necessary code changes using your choice of IDE.
  5. Ensure local liferay portal instance is running on your machine. Deploying Module to Liferay Portal: blade deploy
  6. Add application on site page by logging to liferay portal as admin user

Liferay Portal 7 - Getting Started Guide - Basic setup of Liferay IDE


It's time to get started with Liferay IDE setup by following below quick steps. This post is for you - if you are new to Liferay Portal, but you already have experience with Java development using Eclipse.

Prerequisite

Download
  • Liferay IDE Eclipse - Download latest. For example, 3.0.0 GA1/liferay-ide-eclipse-windows-x64-3.0.0-ga1-201604280251.zip.
  • Liferay Source and Doc - Go to latest "7.0.x GA" version folder and download source and documentation files. For example, I downloaded "liferay-portal-src-7.0-ce-ga1-20160331161017956.zip" and "liferay-portal-doc-7.0-ce-ga1-20160513171934176.zip" from "7.0.0 GA1" folder.  [This is indeed optional, but always good to attach in IDE for quick reference during development]

Basic Setup of Liferay Portal IDE

Unzip Liferay IDE and Open: First of all, unzip the downloaded "Liferay IDE" and open it using "eclipse.exe". You can see, it opens in "Liferay Workspace" perspective by default. In case, you consider to develop older WAR-style plugins using Liferay Plugins SDK, then you can switch to "Liferay" perspective.

Add Liferay Portal server in IDE and Start:
  • New Liferay Server -> Liferay 7.x -> Specify Liferay Portal Directory + Ensure to add "JDK 8" instead of default JRE here (If you keep JRE 8 here, you may face issues later on, for example, Server Administration in Control Panel will complain to replace JRE with JDK) -> Finish.
  • This would create Liferay server in IDE and show "portal-ext.properties" (which you created during liferay portal setup) underneath created liferay server.
  • Start Liferay portal server and wait until you see "server start up in x ms" message in console. (*** Important note: Ensure you don't have liferay instance already running outside Liferay IDE, otherwise you would get port conflict issue)
  • Awesome, now you should be able to see Liferay portal (http://localhost:8080/) in the browser.

Refer Liferay IDE documentation for more detail.

Optional Bonus Tips

Managing Liferay Module Projects in Liferay IDE: Liferay 7.0 architecture offers modularity via OSGI. That means, different modules, so called OSGI bundles, can have their own lifecycle to start, restart, stop, etc. That can be managed using "Gogo Shell" in IDE. Right-click the started portal in server view and select Open Gogo Shell. For example, one can see list of bundles containing "hello" word using this command - lb -s | grep "hello". See Gogo Shell commands documentation.

Import Liferay Portal Source Code in Liferay IDE: Unzip download liferay portal source code and import it in IDE (File -> Import -> General -> Existing Project into Workspace). This would enable you to refer liferay portal code during development, if require.

Install InstaSearch Plugin in Liferay IDE
  • Help -> Eclipse Marketplace -> Search "InstaSearch" -> Install. After installing this plugin, when you restart IDE for the first time, it would take 5-10 minutes to index all projects which are open in IDE.
  • Window -> Show View -> Other -> General - InstaSearch -> Add in the perspective. Start using this plugin for doing keywords based code search. For example, I want to see where is "ElasticSearch" related code in whole portal's codebase! Well, just ask InstaSearch and get the answer. Really super useful plugin.


What's next?

Liferay Portal 7 - Getting Started Guide - Development Tooling Options


In previous post, I wrote steps to setup Liferay portal. What's next? Obviously, just Liferay's out-of-box features or functionality could not be sufficient to accomplish given business use cases. Do you have requirements of customizing liferay provided functionality (via various configuration options or implementing hook plugins) or incorporating custom developed liferay plugins or modules into Liferay portal (in form of portlets, themes, etc.)? Then, let's look at liferay development tooling options.

Liferay Development Tooling Options

Liferay supports different development tooling options. If you are newbie to Liferay, then don't get confused. Below is crux of Liferay Tooling documentation.
  • Liferay IDE: If you are accustomed to use Eclipse IDE, go for this option. Here,
    • Liferay Plugin project = Ant / Maven build type. (*** Refer few quick pointers further on this)
    • Liferay Module Project = Gradle build type.
  • Blade CLI: If you love to use command line tools and want freedom to create projects that can be used with any IDE or development environment, then go for this option. In short, this is a command line tool bootstrapped on to a Gradle based environment that is used to build Liferay 7.0 modules. 
  • Liferay Workspace: A generated environment that is built to hold and manage your Liferay projects, which can be created using both tooling options Liferay IDE as well as Blade CLI. This is the official way to develop newly introduced Liferay 7.0 way of modules using Gradle. At the same time, it also supports older way of developing WAR-style plugins using the Liferay Ant based Plugins SDK.

Few Quick Pointers

At the time of writing this post, following are key pointers to choose development strategy for Liferay 7.

  • Are you looking for old WAR style plugins development (i.e. portlets, themes, hooks, etc.) using Maven, which works greatly with Liferay 6.2? Well, latest Liferay IDE has option to create Maven based plugin project (Liferay New Plugin Project -> Build Type = Maven), but not working as expected. (for example). Because sadly mavens plugins sdk is not available yet for Liferay 7. In fact, I downloaded Liferay Maven Artifacts for Liferay 7 version (e.g. liferay-portal-maven-7.0-ce-ga1-20160331161017956.zip) and installed it in local maven repository, but that also didn't work. So check maven central repository for latest update, before spending time to try Liferay Maven Plugins with Liferay 7.


  • Liferay 7 Modular Architecture silently demands to understand new fundamentals like creating Workspace project and Modules using Liferay IDE or Blade CLI tooling.


What's next?

Liferay Portal 7 - Getting Started Guide - Liferay Portal Setup


It's time to get started with Liferay Portal setup by following below quick steps.

Environment
  • Windows 7 [***NOTE - I have used mentioned environment, but similar steps should work even if you use different OS]

Software Requirements
  • Install JDK 1.8 or later (Liferay portal setup can run with JRE, but better to install JDK as it will be required for development environment)
  • Install MySQL or choice of Liferay supported database (This is optional, but good to have for development environment. At the same time, if you want to setup liferay portal just for quick demo or trial purpose, then you can skip database setup)
  • Liferay Portal Download - Go to latest "7.0.x GA" version folder and download "liferay portal bundled with tomcat / wildfly as per your choice". For example, liferay-portal-tomcat-7.0-ce-ga1-20160331161017956.zip / liferay-portal-wildfly-7.0-ce-ga1-20160331161017956.zip.

Setup Liferay Portal

Unzip Liferay Portal: First of all, unzip downloaded liferay portal bundled with *tomcat* or *wildfly*. For example, I used "liferay-portal-tomcat-7.0-ce-ga1-20160331161017956.zip" to unzip it. Then, create "portal-ext.properties" file in its home folder.

Database configuration for Liferay Portal (Optional, but recommended): By default it comes with embedded "HSQL" database. However, I recommend to configuration it to use your choice of database such as MySQL (Liferay supports range of databases, but for exact supported version you need to refer "Liferay support matrix") for development purpose. Still if you want to setup liferay portal just for demo or trial purpose, then you can skip this step. If you skip database configuration, liferay considers default "HSQL" database to persist in "data" folder.

  • Choose a database server and create a new database, for example I created "lportal-70-ce-ga1" database in MySQL. Here, (i) Create a blank database encoded with the character set UTF-8. Liferay Portal is a multilingual application and needs UTF-8 encoding to display all of its supported character sets. (ii) Create a database user for accessing this database. Grant this database user all rights, including the rights to create and drop tables, to the blank Liferay database.

  • Then, ensure to do correct database configuration in portal-ext.properties file (as per liferay database template). The created database name must match in "jdbc.default.url" value of portal-ext.properties file. Add respective database driver jar file underneath Liferay Portal @ "$TOMCAT_HOME/lib/ext" or "$WILDFLY_HOME/modules/com/liferay/portal/main" folder, if doesn't exist there already.

Start Liferay Portal: Now, start liferay portal for the first time by executing script in "bin" of tomcat/wildfly and . For example, run "Liferay/tomcat/bin/startup.bat". Liferay automatically starts creating required table and some initial setup stuff. Wait… wait… for 5-10 minutes. You should not get any exception, when liferay is doing its first time setup stuff. At the end, you should see "server start up in x ms" message and it would open Liferay's setup wizard (http://localhost:8080/) in the browser.

Finish Liferay Setup Wizard and Restart Portal: Finally, in Liferay's setup wizard, click "Finish Configuration" button followed by restarting the portal as per the liferay instruction. To restart, stop running startup process (CTL+C) and run it again. Again, wait for 5 minutes or so.  At the end, you should see "server start up in x ms" message and it would open Liferay portal (http://localhost:8080/) in the browser. (*Note: If you refresh you database, you should see that Liferay would have created required tables along with initial data.)

Start Exploring Liferay Portal: Congratulations, you are done with liferay portal setup. "Sign In" using "username / password" as default "test@liferay.com / test" admin user. On first login, it asks for agreement and changing password. Just start playing with out-of-box features of liferay portal as per user guide. For example, you can add application or content on given page (i.e. Add -> Search "Blogs" -> Click "Add" of "Blogs"), create new pages (Menu -> Liferay -> Navigation -> Public Pages -> Add Public Page), control panel for portal configuration or managing users / sites / apps, etc.

Refer liferay portal documentation for more setup options.

What's next?

Obviously, just Liferay's out-of-box features or functionality could not be sufficient to accomplish given business use cases. Do you have requirements of customizing liferay provided functionality (via various configuration options or implementing hook plugins) or incorporating custom developed liferay plugins into Liferay portal (in form of portlets, themes, etc.)? Then, let's get started with understanding liferay development tooling options.

Sunday, 18 September 2016

How to use Bootstrap CSS with Webpack in Angular 2 Seed Project?

Being highly experienced Java architect-cum-programmer, having just fundamental knowledge of front-end technologies (i.e. HTML, CSS, JavaScript, jQuery, Jasmine, Bower, Grunt, Node.js, etc.), arbitrarily I thought to get my hands dirty with Angular (so called Angular 2.0 at present) and Bootstrap @ https://github.com/tirthalpatel/Learning-FET/tree/master/gs-angular/gs-angular2-app.

After going through Angular Architecture Overview, I thought to give it a try with Bootstrap CSS. So I decided to take "angular2-seed" project and start from there. This decision really enabled me to play with few Angular syntax and fundamentals quickly. However, a real struggle started, when it came to incorporate Bootstrap CSS into the project. Firstly, I just added bootstrap css {<link href="css/bootstrap.min.css" rel="stylesheet" media="screen">} in index.html as per traditional approach and it didn't work.  After spending few hours, I could realize Angular 2 seed project uses Webpack. Then, google helped me to find how to use Bootstrap (CSS only) and Webpack! Finally, I could incorporate Bootstrap CSS in Angular 2 seed project with further trail-and-error approach as per below steps.

(1) package.json: added bootstrap, babel-core, babel-loader, css-loader, file-loader, style-loader and url-loader dependencies

(2) webpack.config.js: added loaders configuration in module of webpackConfig

(3) app.ts: imported bootstrap.css


A POC project of Angular 2 + Webpack + Bootstrap CSS


A demo project for getting started with Angular 2 and trying its numerous features


Refer README file for instructions of running Angular app.

Saturday, 25 June 2016

Getting Started with Apache Camel using Spring Boot

Well, I am not going to write post to introduce Apache Camel and EIP concepts. Rather I'll just provide quick highlights of the Spring Boot based project skeleton, which I implemented to integrate hawtio and try it with Apache Camel @ https://github.com/tirthalpatel/Learning-Camel/tree/master/gs-camel-spring-boot-helloworld. For promptly getting started with it, you should obviously know Maven, Java and Spring (not necessarily Spring Boot).

First Things First - Understanding Fundamentals


  • Apache Camel is an open-source, lightweight, integration library that allows your applications to accomplish intelligent routing, message transformation, and protocol mediation using the established Enterprise Integration Patterns and out-of-the-box components with a highly expressive Domain Specific Language (Java, XML, or Scala). With Camel you can implement integration solutions as part of an overarching ESB solution, or as individual routes deployed to any container such as Apache Tomcat, Apache ServiceMix, JBoss AS, or even a stand-alone java process. Read more @ DZone Refcard - Essential Camel Components.
  • Enterprise Integration Patterns (EIP): Integration is a hard problem. To help deal with the complexity of integration problems the Enterprise Integration Patterns (EIP) have become the standard way to describe, document and implement complex integration problems. Apache Camel is an open source project for implementing the EIP easily in a few lines of Java code or Spring XML configuration. Read more @ DZone Refcard - The Top Twelve Integration Patterns for Apache Camel.
  • Integration Framework vs. ESB vs. Integration Suite: See remarkable presentation by Kai Wähner @ Spoilt for Choice: How to Choose the Right Enterprise Service Bus (ESB)?

Get Started with Apache Camel Practically

If you don't  know, what is Spring Boot, then immediately read about it. Believe me, it has already become super popular in Java world. Spring Boot nicely gels with Apache Camel too. Anyway you may get started with Apache Camel by following below steps, even if you don't know Spring Boot.

  1. Download or Clone "gs-camel-spring-boot-helloworld" project from Github.
  2. Prerequisites:
    • Java 1.8+
    • Maven (If maven is not installed on your machine, then just use maven wrapper "mvnw", which is already in project. Be aware that you may need to configure proxy settings, if you are in restricted corporate network.)
    • Spring STS or alternate IDE (Optional, but recommended)
  3. Run maven command at project's root to run project: gs-camel-spring-boot-helloworld > mvn spring-boot:run
  4. This would start Spring Boot's embedded server on default 8080 port. In case you need to change it to different port, then you can configure in "application.properties" file at "gs-camel-spring-boot-helloworld\src\main\resources".
  5. Refer README file to import project in IDE or maven's alternative option to run it.
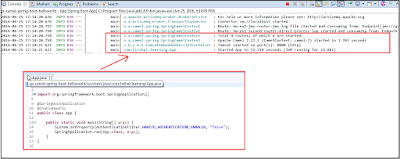
  6. Once you successfully run it, you should see following logs without errors. Well, App.java does all magic to provide Camel Context with help of Spring Boot. (Alternatively, we may write code for creating Camel Context without using Spring.)
  1. Next, you can see logs for executed example code of router configurations, which is using Camel Java DSL.
  1. Then, open hawtio web console in browser @ http://localhost:8080/hawtio/index.html, which I have already integrated in the project. You can see "HelloWorldRouterFirst.java" has timer component, which triggers events and sends to "direct:helloWorldChannel" end-point. In "HelloWorldRouterSecond.java", it route message from "direct:helloWorldChannel" end-point to further. You can see, "HelloWorldRouterFirst.java" has implemented "Deal Letter Channel EIP". To try it practically, just pause or stop "hw-ex1-second-router-direct-process-log" route and see how it reacts. When "hw-ex1-second-router-direct-process-log" is running, it does its job as per configuration in "HelloWorldRouterSecond.java". When "hw-ex1-second-router-direct-process-log" is unavailable (paused or stopped), all events triggered by "hw-ex1-first-router-timer-bean-direct" route would go to "DeadHelloWorldQueue" queue automatically as per configured Camel provided "Deal Letter Channel EIP".
  1. Likewise, following snapshot speaks about another "HelloWorldJmsRouter.java" example router.
  1. Finally, you can implement few examples in similar way using any Camel supported DSL and Components as per your interest. Just ensure to annotate router component with @Component annotation, implement camel's RouteBuilder and add necessary dependencies in Maven's pom.xml. (Read Apache Camel with Spring Boot post to understand how we get Camel context magically.)

Also Refer